-
A Day in the Life of an Edtech Coach (10/14/26)

Made with Gemini - Early Primary Math: Collaborated to use AI tools to generate interactive math slide decks that include structured sentence starters, helping young learners build foundational skills and practice math discourse.
- Elementary ELA & Easing Workflows: Explored digital reading and language tools to support reading fluency and ELD tasks, while also establishing workflows for AI-generated passages and audio/video student feedback.
- Special Education Communication: Streamlined parent updates by leveraging AI to design custom flyer templates, create clear infographics for IEP meetings, and format clean, printable math handouts.
Welcome to another exciting day of integrating technology into our classrooms! On October 14, 2026, I had the pleasure of working with several amazing elementary school educators. From early primary math to special education communication, we explored practical ways to use digital tools to support student learning and simplify teacher workflows.
In our Transitional Kindergarten and Kindergarten classrooms, the focus was on building foundational math skills and encouraging student discourse. We collaborated to craft custom prompts for Gemini. We generated interactive math slide decks that cover number writing, number identification, counting objects, and rote counting. To help our youngest learners explain their thinking, we embedded structured sentence starters right into the slides. Giving students simple sentence frames provides a clear framework for math discussions. For letter and number sounds, we began creating instructional videos, soundboards, and games.
Moving up to third grade, we explored digital reading tools. We looked at Read Along in Google Classroom and discussed the workflow for uploading custom text and generating reading passages with AI. We also reviewed Snorkl reading fluency activities designed to provide targeted practice for students reading below grade level.
In fifth grade, we reviewed their Snorkl implementation for ELA and ELD tasks. We discussed how to manage free account limits by unassigning older activities. We then explored the latest Gemini Notebook updates, including short videos and photo uploads via the Google Drive mobile app. I also shared an overview of 99math and highlighted how to use Google Classroom audio and video recording tools for communicating with students. We even outlined plans for December writing feedback using Snorkl, Gems, and Gemini.
Finally, I worked with a grades 3-5 SDC teacher to streamline parent communication for Special Education. We used Canva AI to design custom flyer templates with student photo placeholders for ParentSquare updates. We also utilized Gemini Notebook to analyze IEP goals and create clear parent infographics and short video overviews for meetings. To top it off, we used Gemini LaTeX prompting to format clean math handouts and export visuals to Google Slides for printing.
Technology integration is all about finding what works best for your classroom. I hope these examples inspire you to try a new digital strategy with your students!
This blog post was drafted with the help of Google Gemini to help organize and flesh out my thoughts and ideas recapping my day as an edtech coach. I also used Gemini Notebook to generate a brief audio overview, perfect for those who want to listen and learn on the go.
If you enjoy this blog, you’ll love our new book, History Matters in an AI Era. Available now on Amazon, this book shares practical, research-based strategies for integrating technology into history lessons. You’ll learn how to use technology to increase student engagement and curiosity. Click here to get your copy today.
-
A Day in the Life of an Edtech Coach (10/12/26)
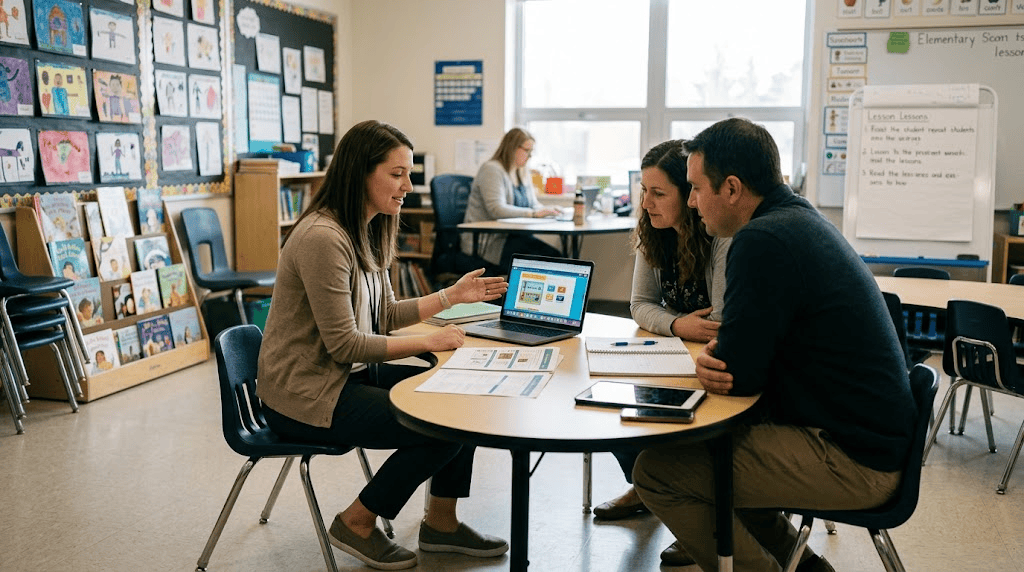
Created with Gemini - Checked in with previously coached elementary teachers and sent preparatory reminders to a school administrative team to ensure alignment.
- Assisted an eighth-grade ELA teacher with implementing the Fast and Curious Eduprotocol for vocabulary and collaborated with a Learning Director on digital benchmark assessments in Snorkl.
- Partnered with a first-grade team to explore early reading fluency tools, including Google Read Along and Google Slides audio recording.
Communication and consistency are the foundation of my coaching practice. I began my morning by sending follow up emails to the elementary teachers I coached last week. It is crucial to always check in and follow up a week later to see how new strategies are working and offer any needed encouragement. After that, I sent a reminder email to the admin team at a school I will be supporting next week. Providing a week in advance notice ensures we are perfectly aligned and prepared to make the most of our time together.
Classroom collaboration is where the real magic happens. Last week I worked closely with an eighth grade English Language Arts teacher who is passionate about building and reinforcing student vocabulary. They want to implement the Fast and Curious Eduprotocol as part of their Lit Lab class. To support this vision, today, I am helping by putting the weekly vocabulary lists directly into Wayground. This allows the teacher to have a seamless weekly vocabulary assessment ready to deploy the Eduprotocol successfully.
Later in the afternoon, I met with a Learning Director to explore online options for administering a second grade benchmark. Our goal was to find a more efficient way to view student data and recognize learning trends. To solve this, I created a sample assessment in Snorkl using their new activity sets feature. This solution will ultimately save teachers time and provide clear data to guide their instruction.
I wrapped up my day working alongside a first grade team to explore tools for reading fluency. We explored Google Read Along as a fantastic tool for young readers. We also practiced how to easily record read alouds for students using the record feature in Google Slides. Discovering these simple but powerful classroom applications is what makes coaching so rewarding. Keep trying new tools because every small step makes a big difference for your students.
This blog post was drafted with the help of Google Gemini to help organize and flesh out my thoughts and ideas recapping my day as an edtech coach. I also used Gemini Notebook to generate a brief audio overview, perfect for those who want to listen and learn on the go.
If you enjoy this blog, you’ll love our new book, History Matters in an AI Era. Available now on Amazon, this book shares practical, research-based strategies for integrating technology into history lessons. You’ll learn how to use technology to increase student engagement and curiosity. Click here to get your copy today.
-
A Day in the Life of an Edtech Coach (10/9/26)

Created with Gemini - Remotely assisted an eighth grade teacher in overcoming tool access limitations by using a direct link to Gemini and a video tutorial to help students create and submit narrative infographics through Google Classroom.
- Conducted coaching sessions to organize Constitution review notebooks and implement the Fast and Curious Eduprotocol for vocabulary reinforcement, followed by co-teaching a post-lunch inference lesson using Snorkl.
- Collaborated with an elementary resource specialist teacher to streamline workflows and generate multilingual visual materials for Individualized Education Program goals using Gemini Notebook.
The morning began with remote support for an eighth grade English language arts and history teacher. The goal was to help students create infographics based on narrative writing using Gemini Notebook. A hurdle quickly appeared when the teacher discovered that students could not use the infographic tool through Google Classroom because Gemini Notebook was not available for students to access independently and student access to Gemini Notebook does not include studio tools such as infographic. The solution was coaching the teacher to add a direct link to gemini.google.com within a Google Classroom assignment. This allowed students to access Gemini and use the image creation feature to help build infographics from their stories. To make the process smooth, a how to video was shared with the students showing the steps to create, download, and submit their final infographics through Google Classroom.
Next came an in depth one on one coaching session with another eighth grade teacher. Together, the focus shifted to assigning digital Constitution notebooks (Gemini Notebook) so students could study effectively while preparing for their upcoming Constitution test. From there, the session explored the Fast and Curious Eduprotocol for a literature lab class to help reinforce essential vocabulary.
Later in the afternoon, the coaching turned into direct action with a co-taught lesson focused on making inferences using Snorkl. The timing right after lunch meant the students were initially a bit sluggish. However, as the lesson progressed, the class became deeply engaged with the instant feedback provided by the platform. The students persevered through the post lunch lull and many successfully mastered the activity.
The workday concluded with an elementary RSP teacher. The discussion centered on finding ways to use Gemini Notebook to expedite daily workflow. The teacher learned how to efficiently create visual materials for individualized education program goals, supporting both educators and parents by generating resources in multiple languages.
Moments like these show the core purpose of instructional coaching. By partnering with teachers to overcome technical hurdles, streamline workflows, and bring engaging tools to students, educators can focus on what matters most: helping learners grow.
This blog post was drafted with the help of Google Gemini to help organize and flesh out my thoughts and ideas recapping my day as an edtech coach. I also used Gemini Notebook to generate a brief audio overview, perfect for those who want to listen and learn on the go.
If you enjoy this blog, you’ll love our new book, History Matters in an AI Era. Available now on Amazon, this book shares practical, research-based strategies for integrating technology into history lessons. You’ll learn how to use technology to increase student engagement and curiosity. Click here to get your copy today.
-
A Day in the Life of an Edtech Coach (10/8/26)
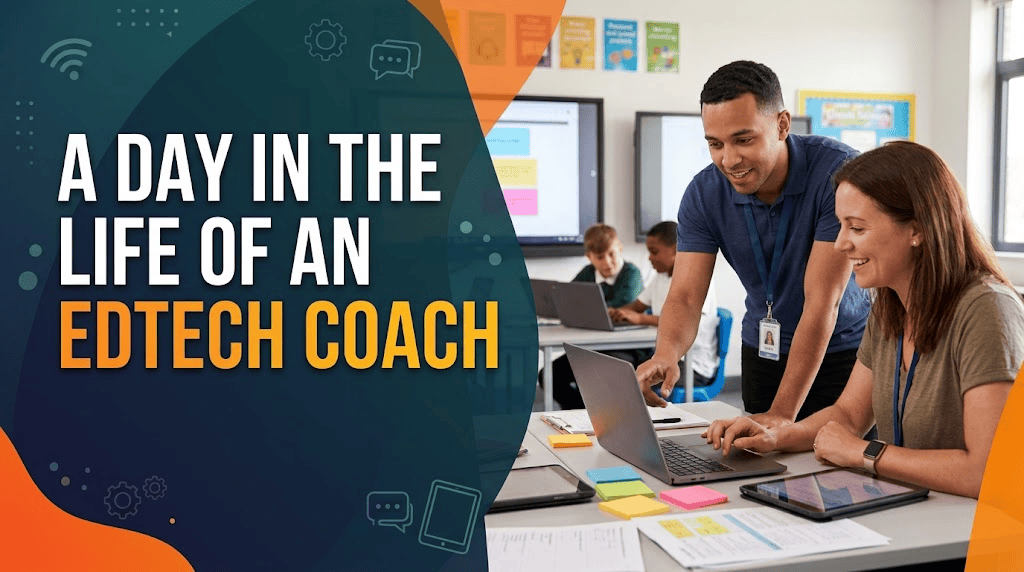
- Evaluated Figjam and Chrome Canvas as alternative whiteboard tools for an intervention teacher due to the upcoming sunset of Microsoft Whiteboard.
- Created a custom Gemini Gem to provide students with fast feedback on narrative drafts while preserving academic integrity by restricting it from writing for them.
Every day brings unexpected challenges and exciting opportunities for an educational technology coach. Recently I met with an intervention teacher who had mastered using a Newline interactive display alongside Microsoft Whiteboard. She had built a wonderful workflow for her and her students, but she learned that Microsoft Whiteboard will sunset in a few weeks and reached out for help finding an alternative. After some light research we landed on two options. One was Figjam by Figma which has a free education version doing virtually everything she did previously. The other was Chrome Canvas, an often overlooked Google tool offering similar capabilities to Jamboard and Microsoft Whiteboard.
Later that day I walked into an eighth grade classroom to prepare for a meeting the following morning. The room was empty, but I noticed an instructional prompt for a narrative writing assignment displayed on the screen. Inspired by what I saw, I decided to build a custom Gem in Gemini that the teacher could deploy to her students for expedited feedback on their drafts.
I sent the Gem to her and she was excited to try it. Afterward I walked her through the process of deploying the tool through Google Classroom. We carefully configured the Gem so that it only provides constructive feedback and will never write or revise anything for the students, ensuring complete academic integrity. Moments like these remind us how adaptability and creative problem solving keep classrooms moving forward.
This blog post was drafted with the help of Google Gemini to help organize and flesh out my thoughts and ideas regarding my day as an edtech coach. I also used Gemini Notebook to generate a brief audio overview, perfect for those who want to listen and learn on the go.
If you enjoy this blog, you’ll love our new book, History Matters in an AI Era. Available now on Amazon, this book shares practical, research-based strategies for integrating technology into history lessons. You’ll learn how to use technology to increase student engagement and curiosity. Click here to get your copy today.
-
Clearing the Traffic in Your Google Classroom Stream
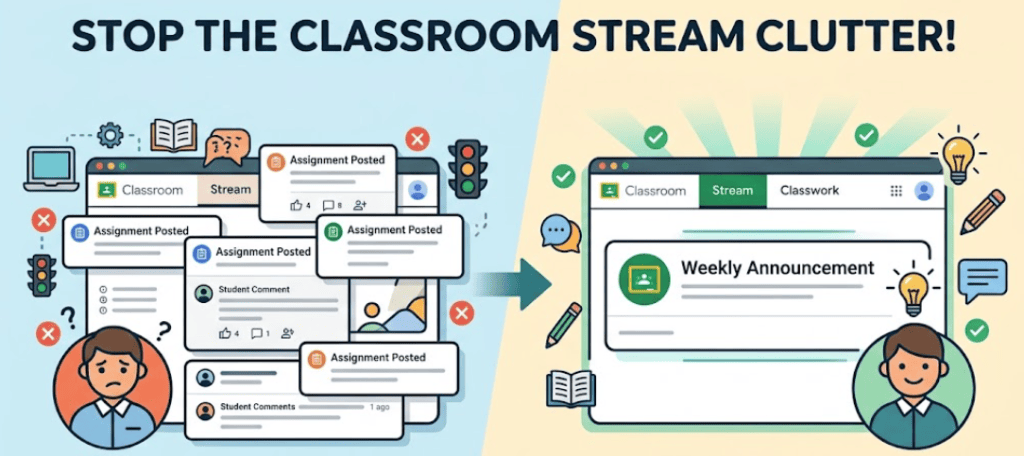
- Default Google Classroom settings mix assignment notifications with announcements and cause students to miss important updates.
- Teachers can improve student workflow by using the Stream exclusively for communication and the Classwork tab strictly for assignments.
- You can hide assignment posts in the Stream by navigating to settings and changing the Classwork on the stream option to hide notifications.
The Google Classroom Stream can sometimes feel like navigating bumper to bumper traffic. By default, this space lists every single assignment a teacher posts. However, it also serves as the main area for a teacher to send announcements to their students. With all of those assignment notifications flooding the stream, important announcements can easily get lost in the shuffle and be missed by students.
In my experience, separating these two functions creates a much smoother learning environment. Keeping the stream strictly for announcements and communication, while reserving the Classwork tab entirely for assignments, has proven very successful for maintaining an easy to understand workflow for students. They learn exactly where to look. They know announcements will only appear in the stream and their actual assignments will always be in the Classwork tab. This dedicated communication space allows you to leave class updates, important reminders, and motivational messages in the stream without them getting buried under daily classwork.
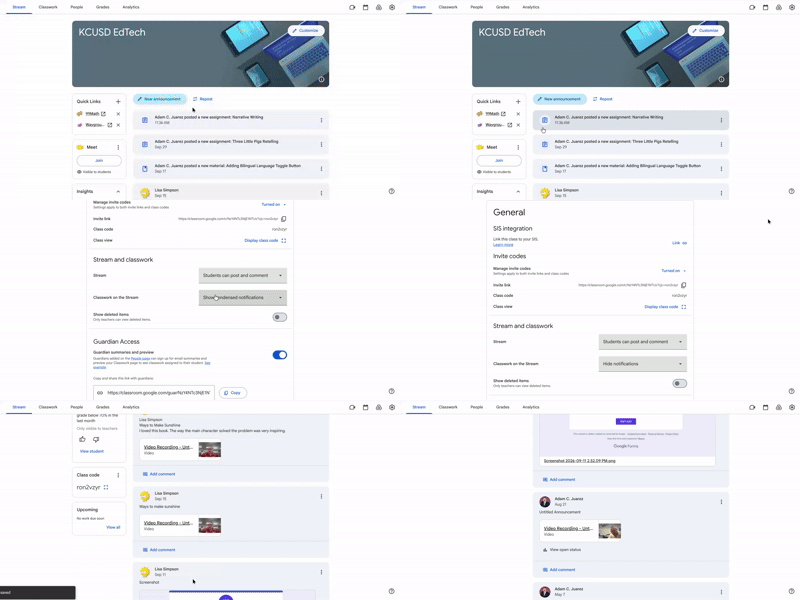
To facilitate this efficient workflow, navigate to the settings gear located at the top right of the Stream tab. Scroll down until you find the section titled Stream and classwork. Look for the setting named Classwork on the stream and click the drop down menu. If the setting currently says Show condensed notifications or Show attachments and details, simply change it to Hide notifications. Finally, click save in the top right corner of your screen. When you return to your Stream, you will enjoy a clean space containing only your announcements and no assignment posts.
This blog post was drafted with the help of Google Gemini to help organize and flesh out my thoughts and ideas regarding how to unclog the assignment/announcement traffic in the Google Classroom Stream. I also used Gemini Notebook to generate a brief audio overview, perfect for those who want to listen and learn on the go.
If you enjoy this blog, you’ll love our new book, History Matters in an AI Era. Available now on Amazon, this book shares practical, research-based strategies for integrating technology into history lessons. You’ll learn how to use technology to increase student engagement and curiosity. Click here to get your copy today.
-
Streamlining Student Writing Feedback with AI

- Teachers can save valuable grading time by using Gemini to analyze student writing while using a Google for Education account to maintain privacy and compliance.
- You can easily paste student Google Doc links directly from your automatically generated Google Classroom Drive folder into Gemini alongside your rubric.
- Alternatively you can upload your rubric and student assignments directly into Gemini Notebook to quickly identify class trends and generate individual scores.
Evaluating student writing can be an incredibly time consuming task. Many educators find themselves working well beyond contracted hours just to keep up with grading essays and reflections. Fortunately, there is a practical hack to expedite the analysis and scoring of student writing using Gemini. This approach helps you gain quick insights into how your students are performing so you can efficiently prepare for targeted interventions and extensions.
Before starting, always remember to use your Google for Education account. This is a vital step to ensure your work remains completely COPPA and FERPA compliant. Additionally, you must always vet all generated responses using your professional teacher experience and judgment. Do not offload your teacher thinking to Gemini. It is important to verify all responses to maintain the integrity of your feedback.
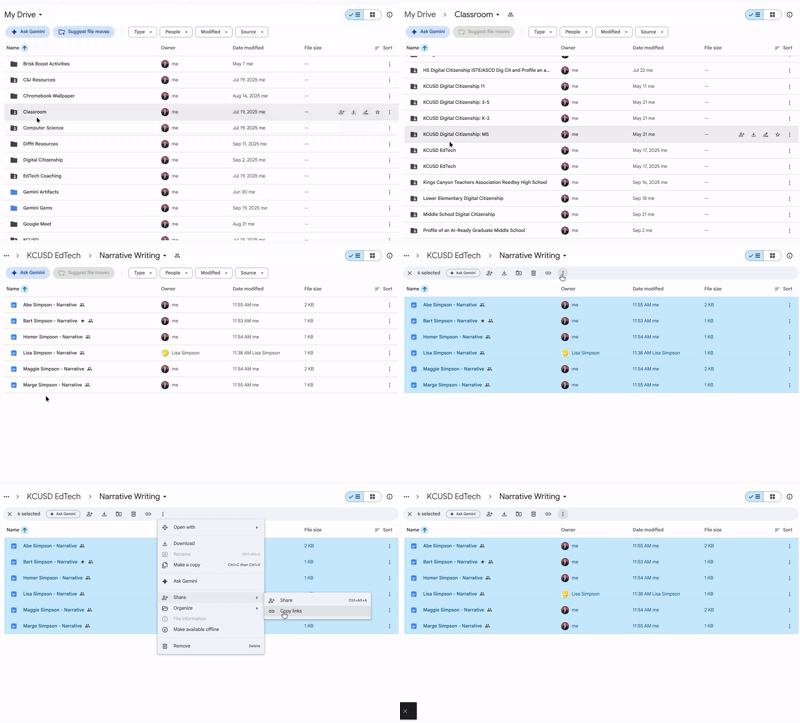
The first method combines Google Classroom and Gemini. If you were not aware, every Google Classroom assignment automatically has a corresponding folder in Google Drive. When you create an assignment, a folder is automatically created in Drive within your dedicated Classroom folder. If your students are submitting their writing on Google Docs via Google Classroom, open the Classroom folder in Drive, open the folder for your specific class, and then find and open the folder for the specific writing assignment. Select all the documents in the folder, click the three dots at the top or right click, click Share, and copy the links.
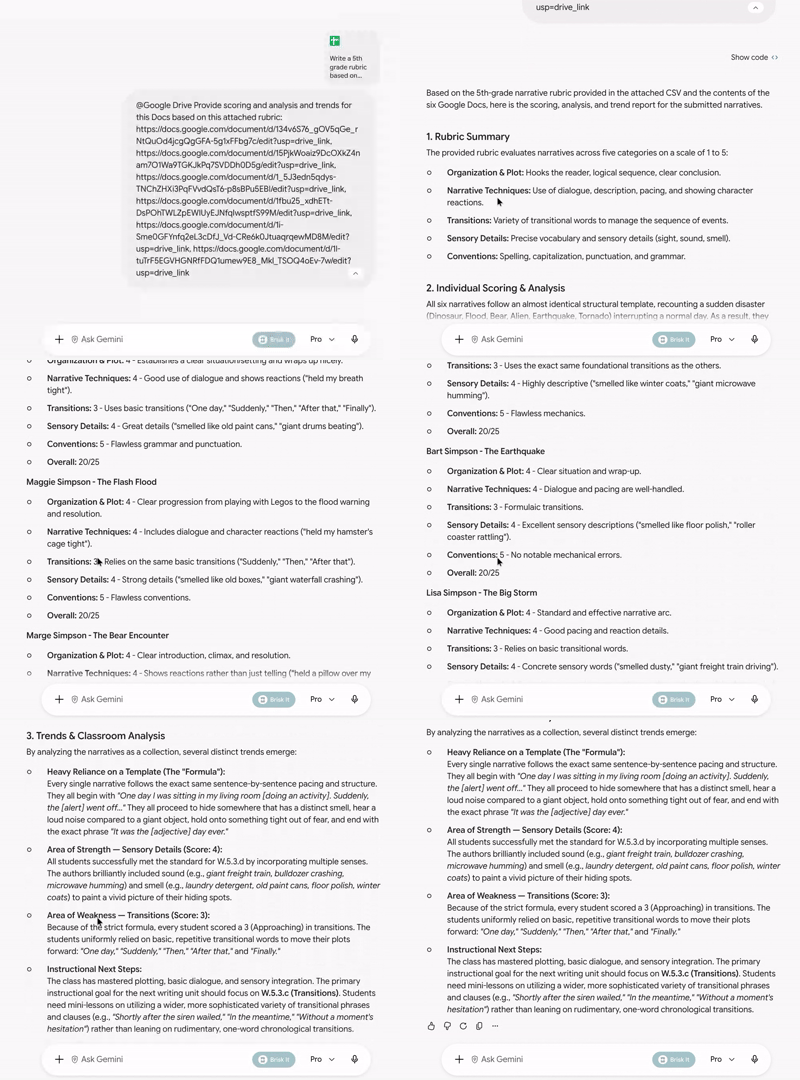
Next, go to Gemini. Attach your rubric and prompt the tool to provide overall trends, analysis, and individual scoring for the linked documents. Finally, paste in all the links you recently copied from Drive. In just a few moments, those linked documents will be scored according to your rubric. The output will also show overall patterns and trends from the student writing overall.
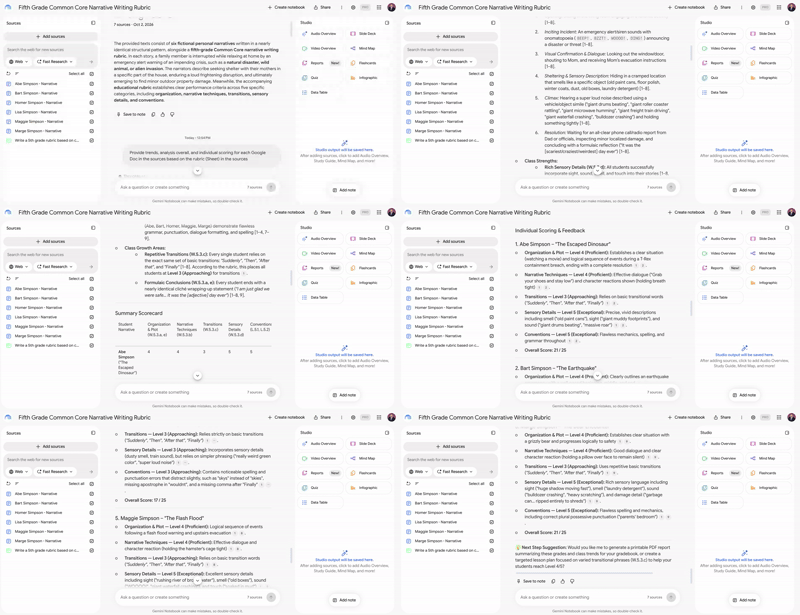
Another great method is to create a new notebook in Gemini Notebook, which was formerly known as NotebookLM. Simply add your rubric and the student writing documents as your sources. Just like in the standard Gemini interface, you can prompt the notebook for trends, analysis, and individual scoring. Both of these strategies will help you support your students while preserving your valuable time.
This blog post was drafted with the help of Google Gemini to help organize and flesh out my thoughts and ideas regarding how to utilize Gemini and or Gemini Notebook to help evaluate student writing and see trends. I also used Gemini Notebook to generate a brief audio overview, perfect for those who want to listen and learn on the go.
If you enjoy this blog, you’ll love our new book, History Matters in an AI Era. Available now on Amazon, this book shares practical, research-based strategies for integrating technology into history lessons. You’ll learn how to use technology to increase student engagement and curiosity. Click here to get your copy today.
-
Unlocking Student Insights With Google Classroom and Gemini
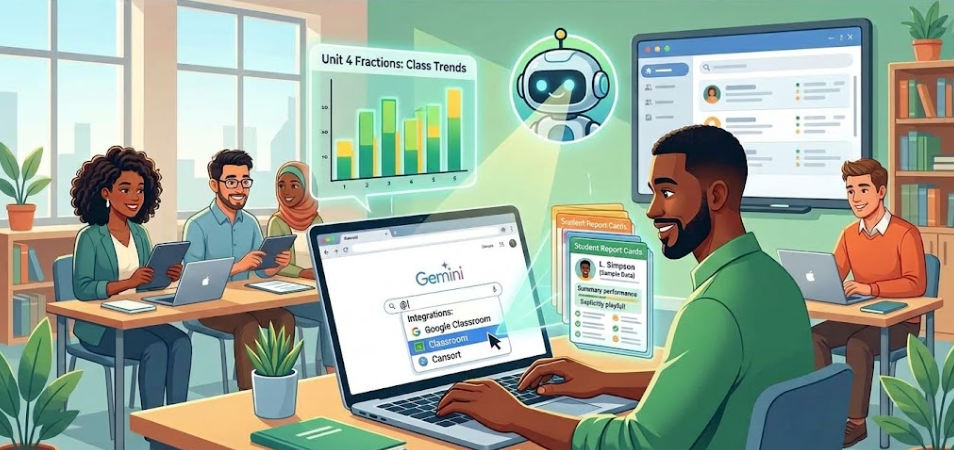
- Teachers with a Google for Education account can type the @ symbol in Gemini to instantly access and analyze their Google Classroom data.
- The tool identifies class-wide learning trends on recent assignments, allowing educators to efficiently adjust their lesson plans.
- Gemini can generate personalized report cards for each student to provide a clear performance snapshot for parent meetings or individual check-ins.
As an educator, you already know how valuable Google Classroom is for organizing assignments and collecting grades. However, finding the time to analyze all of that data can be a challenge. When you are managing dozens or even hundreds of students, trying to identify learning trends often feels like a daunting task. Fortunately, there is a faster way to gather insights from your classes using a tool you already have.
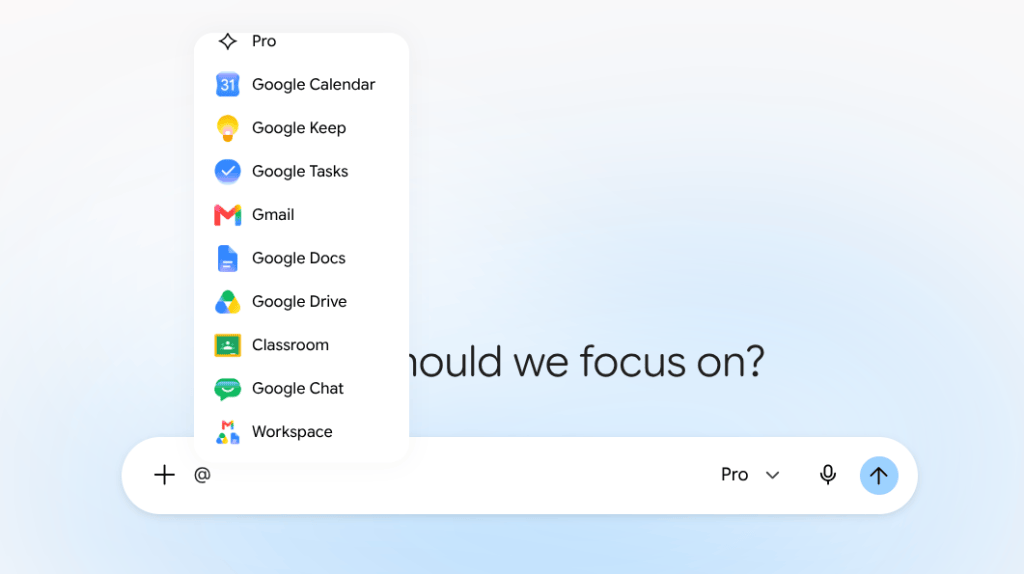
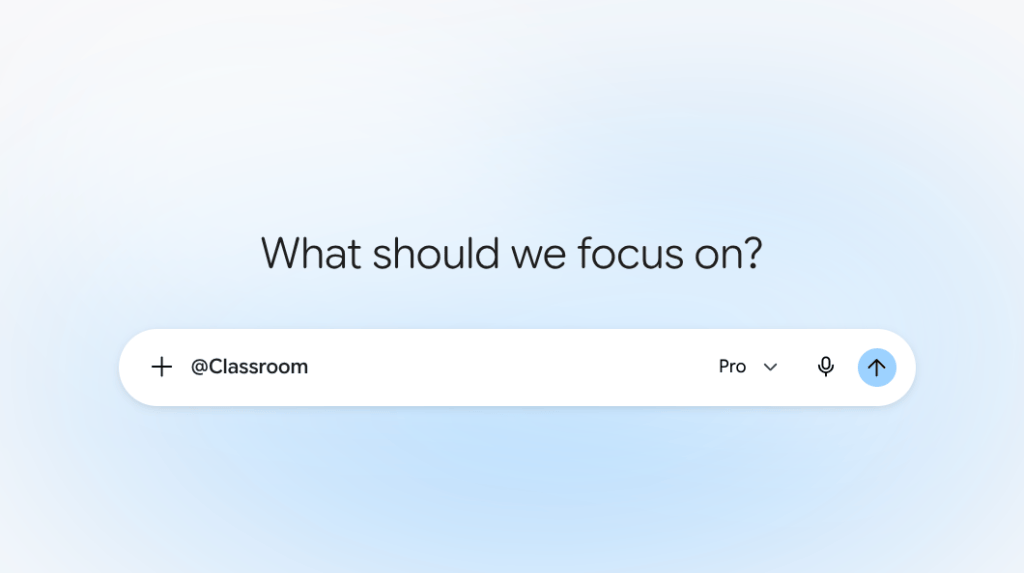
If you have a Google for Education account, you can use Gemini to quickly understand your classroom data. The process is incredibly simple. All you need to do is open Gemini, type the @ symbol, and select Classroom. This allows you to connect directly to your Google Classroom. Once connected, you can ask the system for trends, insights, and more about one specific class or all of your classes at the same time.
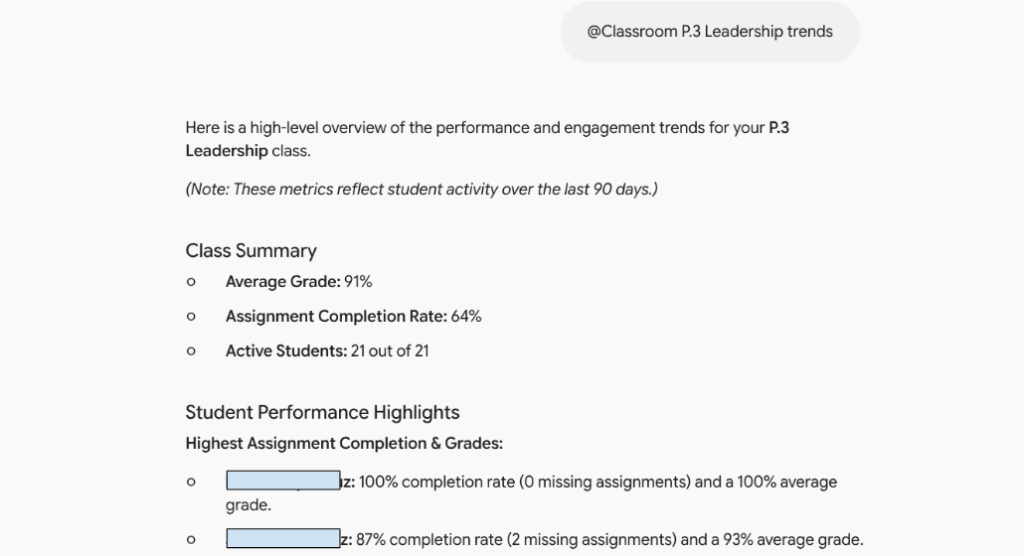
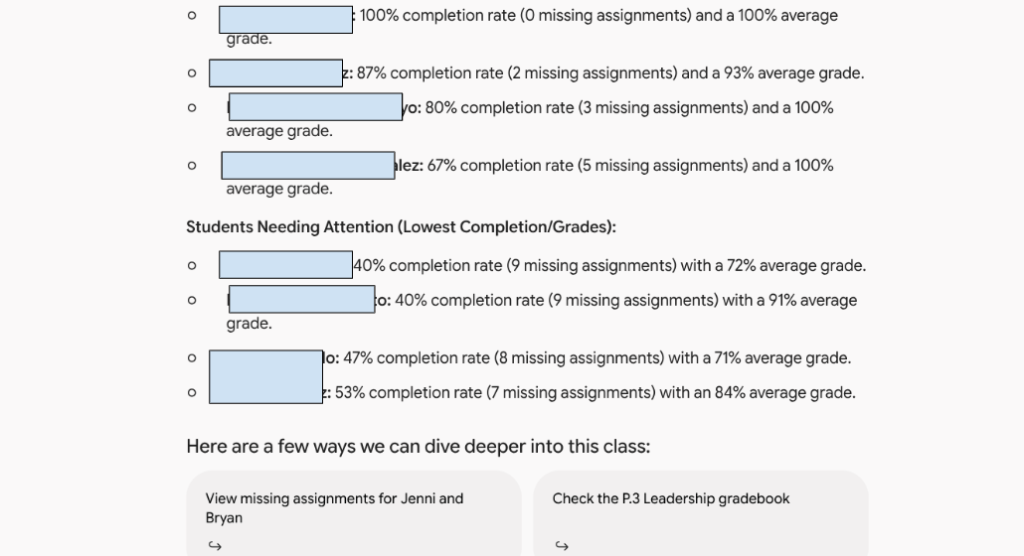
Imagine you just finished a unit and want to know how well the class grasped the concepts. Instead of clicking through individual grades, you can type the @ symbol , select Classroom, and ask Gemini to analyze the trends from the recent assignments. The system will gather the insights for you, showing you exactly where your students excelled and where they might need a quick review. This practical application allows you to adjust your lesson plans instantly, ensuring your students get the specific support they need before moving on to the next topic.
The capabilities go beyond overall class trends. You can even ask Gemini to generate an individual report card for each student. This feature pulls together a student’s performance data into one clear summary. Having a personalized report card ready is perfect for parent meetings or individual check-ins. It provides a helpful snapshot of student progress, allowing you to celebrate their individual successes and set meaningful goals for the future.
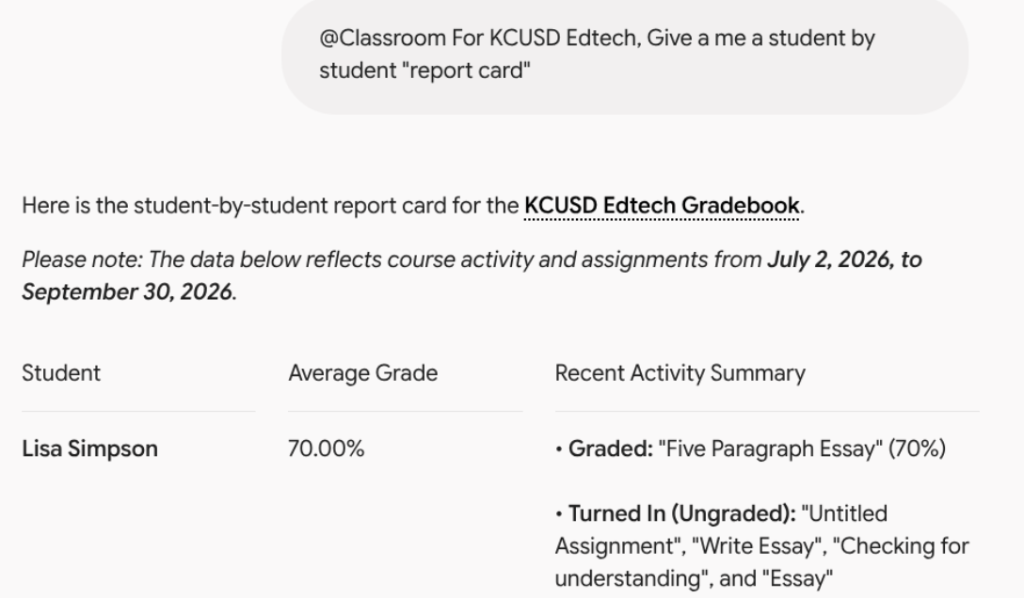
Lisa Simpson is bogus student name created for this sample By using this simple integration, you can spend less time crunching numbers and more time doing what you do best: teaching. Technology should make your daily workflow easier, and this feature certainly delivers on that promise. The next time you log into your Google for Education account, try typing that @ symbol in Gemini and see how much valuable time you can save.
This blog post was drafted with the help of Google Gemini to help organize and flesh out my thoughts and ideas regarding how to utilize Gemini to help analyze trends and data in Google Classroom. I also used Gemini Notebook to generate a brief audio overview, perfect for those who want to listen and learn on the go.
If you enjoy this blog, you’ll love our new book, History Matters in an AI Era. Available now on Amazon, this book shares practical, research-based strategies for integrating technology into history lessons. You’ll learn how to use technology to increase student engagement and curiosity. Click here to get your copy today.
-
From Idea to Interactive A Teachers First Custom Tool
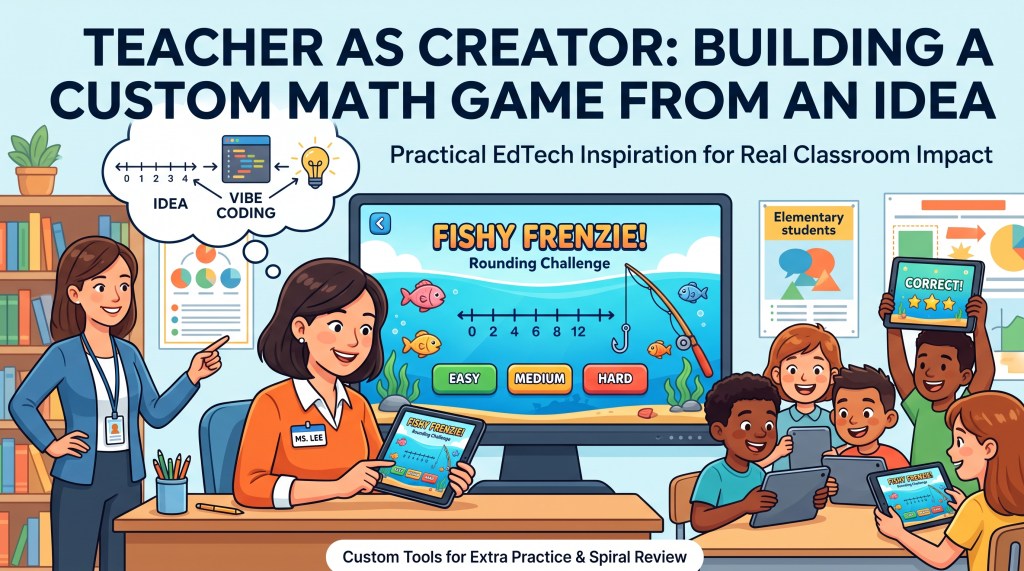
Created with Gemini - A teacher used vibe coding to build a custom math activity.
- The result is a fishing-themed rounding game with adjustable difficulty.
- The tool is ideal for extra practice, spiral review, or station rotations.
As an instructional coach, few things are more rewarding than seeing a teacher take a new concept and truly run with it. It is moments like these that remind me why I love supporting educators. Earlier this week, I had the privilege of collaborating on an elementary grade math lesson where we explored Snorkl. The lesson went well and opened the door to productive conversations.
During our debrief, we brainstormed different ways to extend student learning and provide targeted practice on specific math skills. To help spark ideas, I showed the teacher a custom number line tool that I vibe coded a while back. Seeing this creation really got her thinking about building personalized tools to meet the specific needs of her students. We discussed the concept of vibe coding together, and she left feeling intrigued.
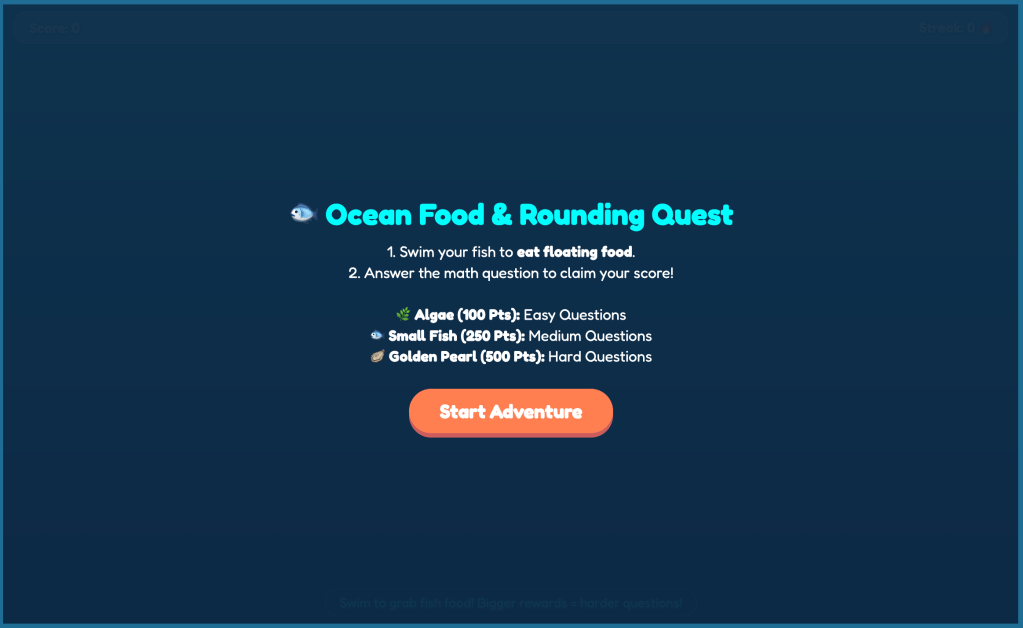
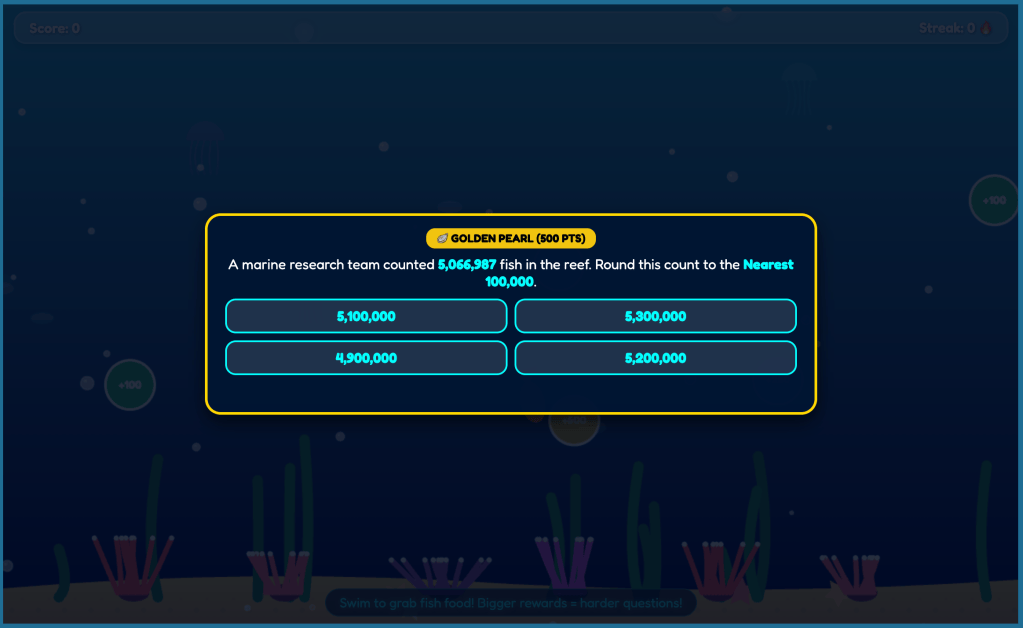
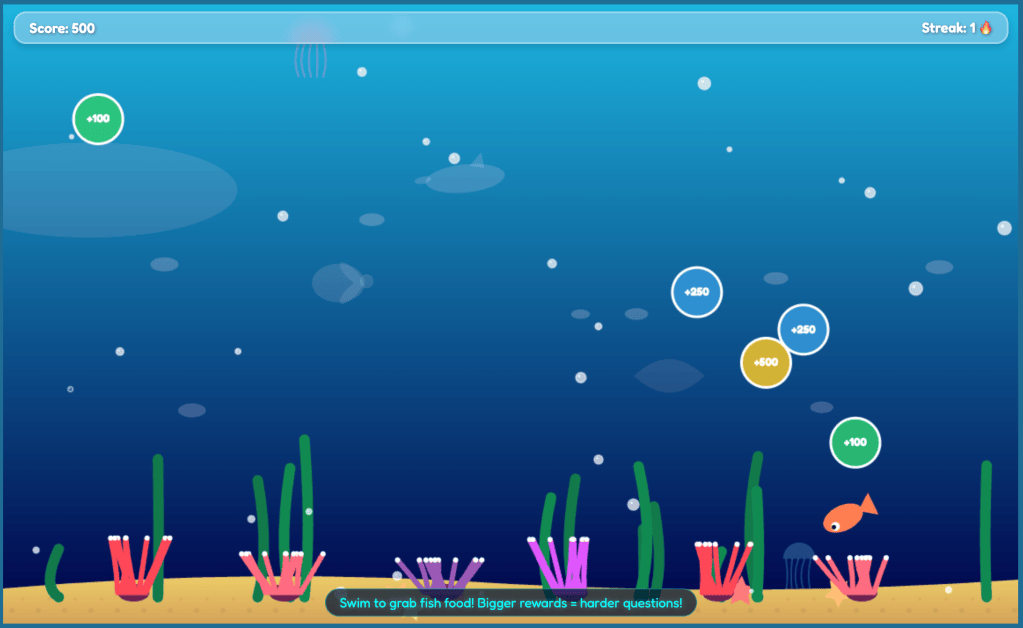
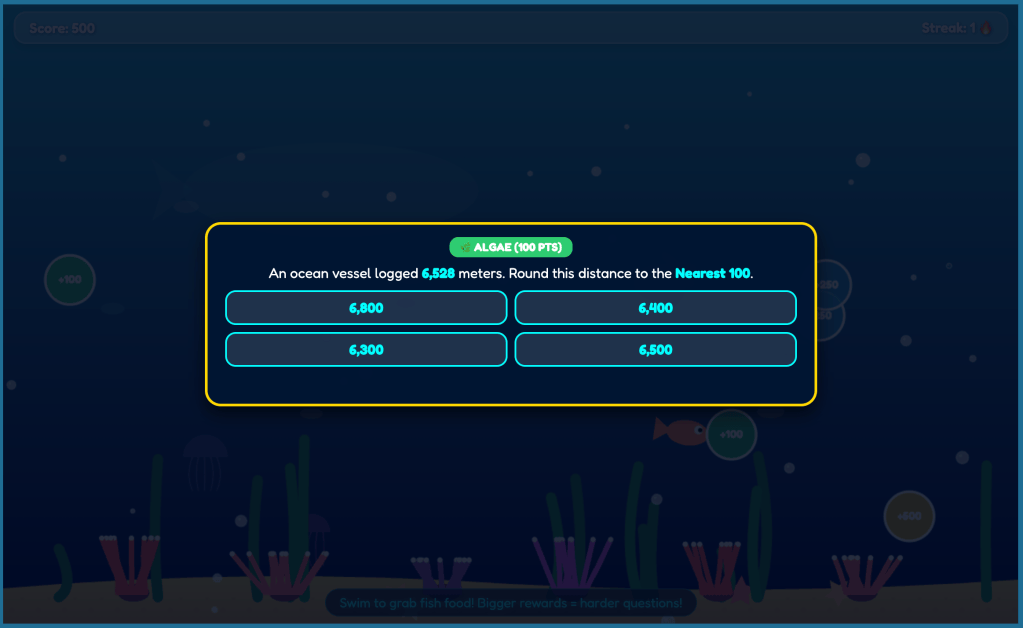
What happened next is a perfect example of educator creativity. Only a few days after initially learning what vibe coding is, she surprised me by designing and launching her very own interactive learning tool. She created an engaging rounding game built around a fun fishing theme. In this activity, kids are challenged to round random numbers to a nearest specific place value.
What makes her design even better is how it incorporates student agency. After getting a correct answer, the user is tasked with choosing their next challenge. They determine the difficulty level themselves by selecting between easy, medium, and hard options. Providing this personalized path keeps students motivated to keep trying.
This new interactive tool will fit perfectly into her classroom routine. It provides an excellent resource for times when students need extra practice on specific skills. It is also a fantastic option for spiral review throughout the school year or as an engaging activity during math station rotations.
I have to say that this is an incredibly impressive project for a brand new vibe coder.
This blog post was drafted with the help of Google Gemini to help organize and flesh out my thoughts and ideas regarding my experience coaching a teacher to use different AI tools and vibe coding. I also used Gemini Notebook to generate a brief audio overview, perfect for those who want to listen and learn on the go.
If you enjoy this blog, you’ll love our new book, History Matters in an AI Era. Available now on Amazon, this book shares practical, research-based strategies for integrating technology into history lessons. You’ll learn how to use technology to increase student engagement and curiosity. Click here to get your copy today.
.
-
Bringing Lessons to Life with Audio in Google Classroom
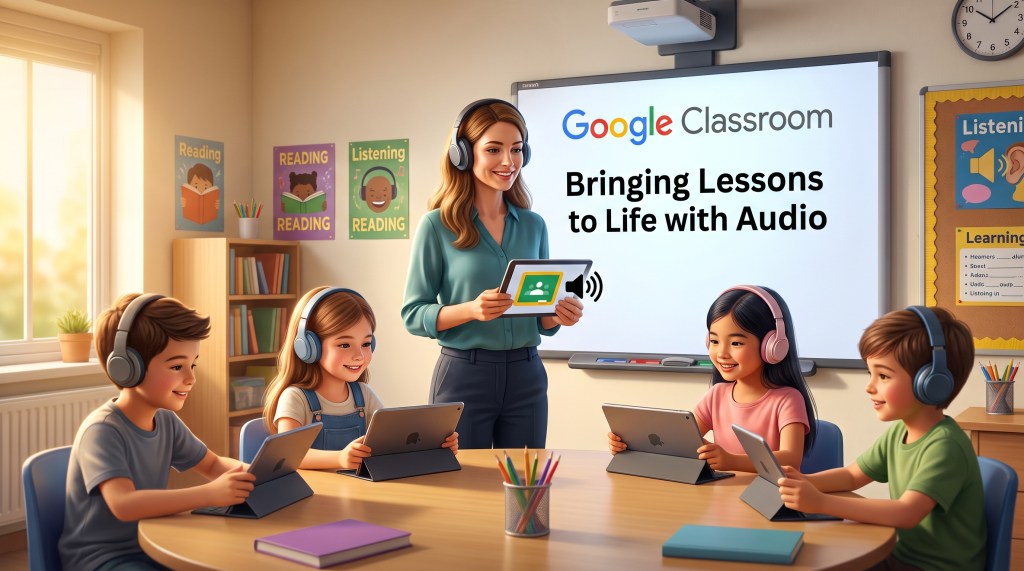
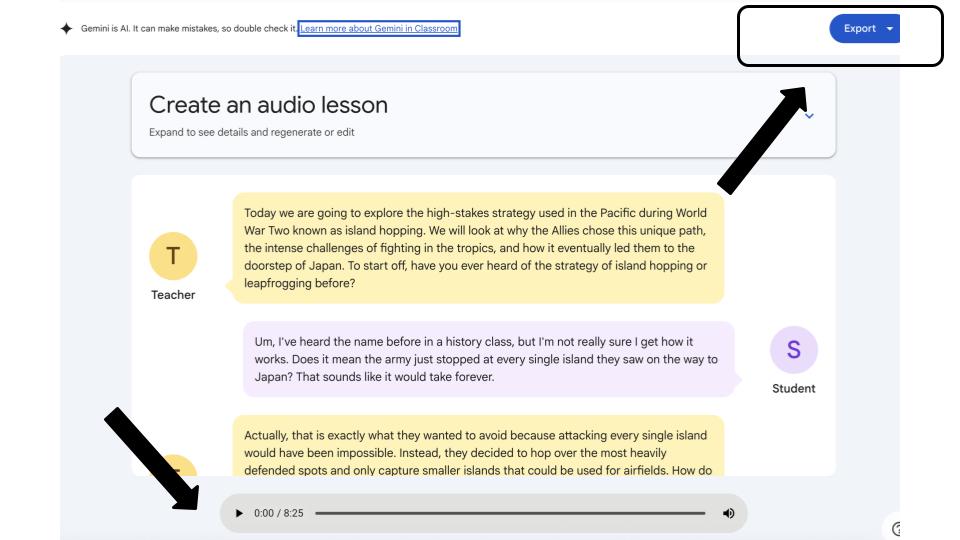
Created with Gemini - Access Gemini from the left toolbar in Google Classroom to create a custom audio lesson by grade level and standard.
- Generate and edit suggested learning objectives, then personalize the experience with selected speaker voices and avatars.
- Listen to the text dialogue, save the audio directly to Google Drive, or convert it into a slide deck for class presentation.
Integrating audio into daily instruction is a powerful way to engage diverse learners and support differentiated learning. With Gemini built directly into Google Classroom, creating interactive audio experiences tailored to your curriculum is simple and quick.
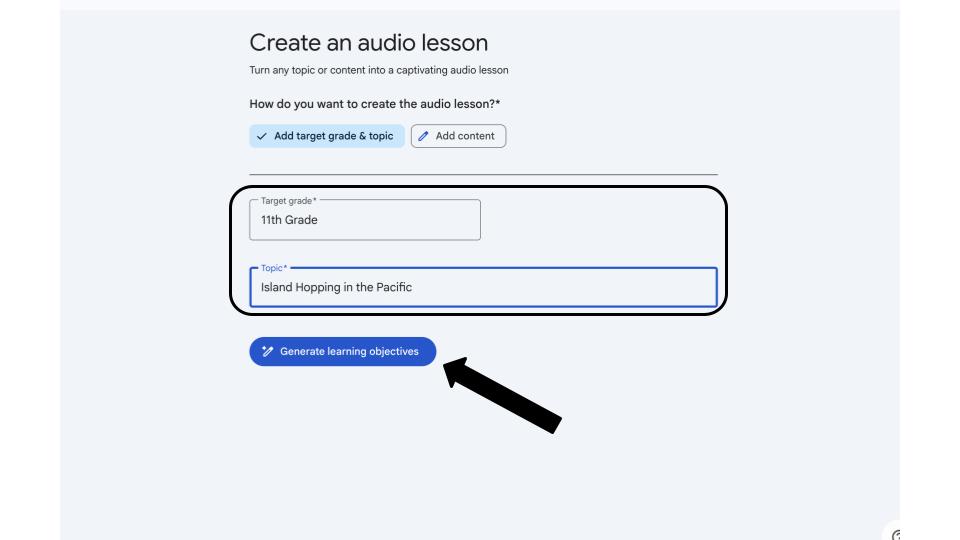
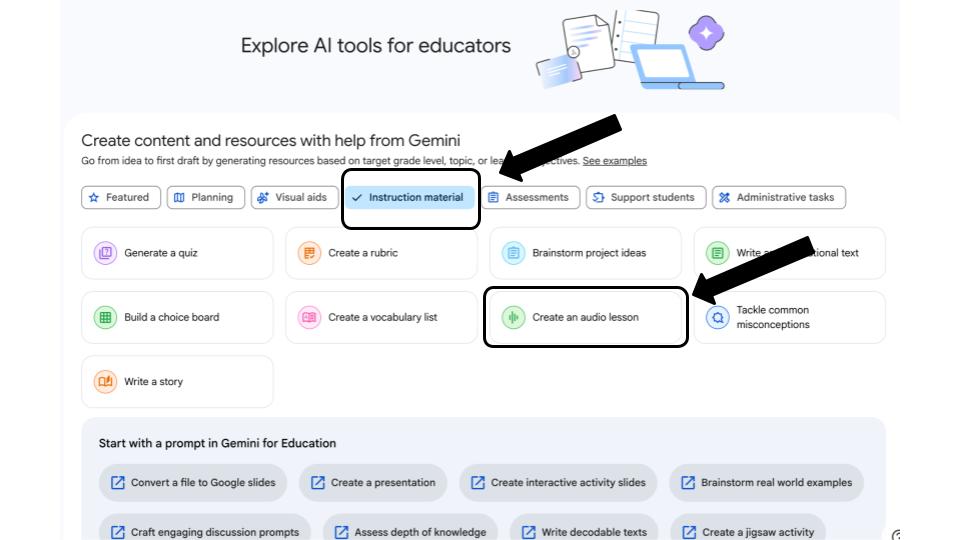
To get started, open your Google Classroom homepage and click the Gemini option located on the left toolbar. Next, choose instructional material to filter your options and select the feature to create an audio lesson. From there, enter your target grade level along with the specific topic or academic standard you want to cover.
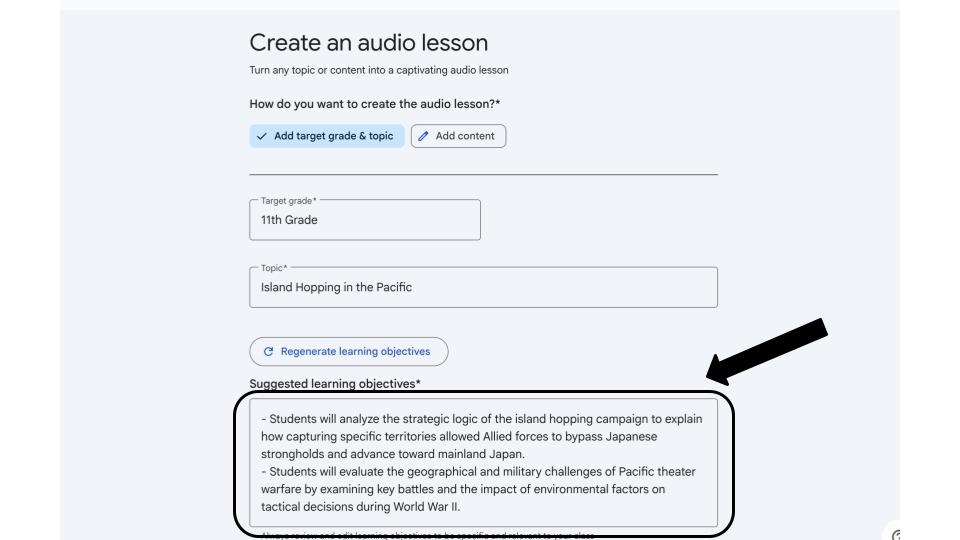
After entering your lesson details, click the button to generate learning objectives. Gemini provides suggested objectives to guide your content. Because these goals are fully editable, you can easily tweak them to fit your exact classroom goals.
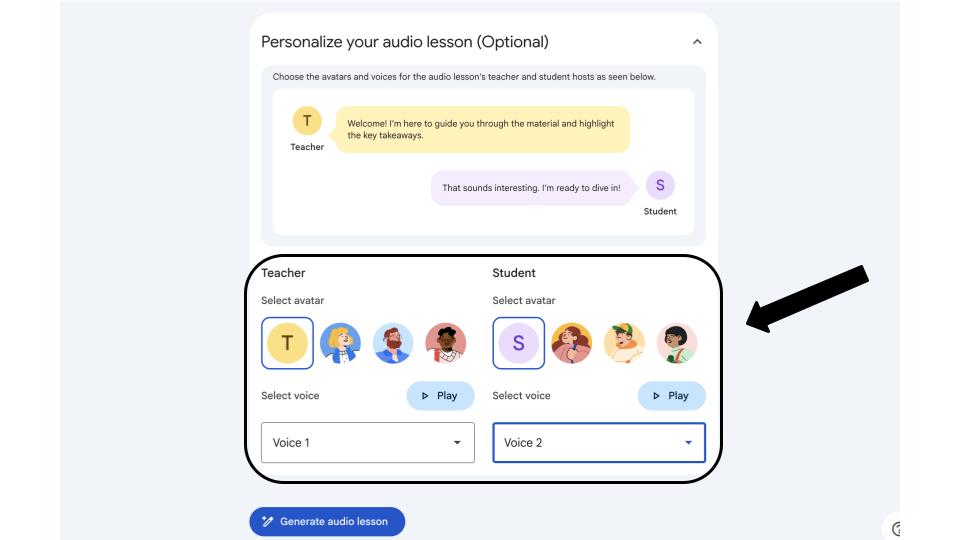
You can also personalize the listening experience to make it engaging for students. Select custom voices and avatars for both the host and student speakers before generating the final audio.
Once created, the completed lesson appears as a readable dialogue that you can listen to using the play button. When you are ready to share it with your students, the export option lets you save the audio file directly to Google Drive or automatically convert the conversation into a slide deck for whole-class presentation.
Whether you want to build listening stations, support auditory learners, or offer an interactive review before an assessment, this tool provides a practical and creative way to enrich your teaching.
Watch the full walkthrough video below.
This blog post was drafted with the help of Google Gemini to help organize and flesh out my thoughts and ideas regarding how to create an audio lesson with Gemini in Google Classroom. I also used Gemini Notebook to generate a brief audio overview, perfect for those who want to listen and learn on the go.
If you enjoy this blog, you’ll love our new book, History Matters in an AI Era. Available now on Amazon, this book shares practical, research-based strategies for integrating technology into history lessons. You’ll learn how to use technology to increase student engagement and curiosity. Click here to get your copy today.
-
Tag, You’re It! Streamline Progress Tracking in Google Classroom

Created with help from Gemini - Tag Standards: Link up to 10 curriculum-specific standards directly to any assignment.
- Build Rubrics: Instantly generate custom rubrics from your tagged learning goals.
- Track Mastery: Monitor student progress organized by standard in the Grades tab.
Are you looking for a more efficient way to track student progress against specific curriculum standards? Google Classroom has introduced a powerful new feature to help: Tag learning goals. This tool allows you to link educational standards directly to your assignments, providing a streamlined way to monitor student growth over time.
Getting Started
To use this feature, simply create a new assignment and click the “tag learning goals” button located just below the instruction box. A pop-up window will appear, allowing you to filter standards by country and state. From there, you can navigate the hierarchy to select the specific set of standards that apply to your curriculum. You are permitted to tag up to 10 specific standards for a single assignment, ensuring your focus remains sharp.
Streamlined Grading with Rubrics
Once your standards are tagged, Google Classroom offers the option to build a custom rubric directly from those selected goals. To make the most of this, be sure to add your own descriptive information to the rubric levels. This ensures your grading criteria align perfectly with your specific learning objectives for that lesson, making expectations transparent for your students.
Visualizing Student Mastery
The true benefit of this feature is found in the Grades tab. Here, you can view student work organized by standards rather than just by assignment title. By clicking on any specific standard, you can access detailed performance data and see a list of every assignment where 그 specific standard was tagged. This high-level view is a powerful way to track student mastery throughout the school year.
For teachers learning to integrate technology into their practice, “Tag learning goals” turns raw grades into actionable insights. Start tagging your assignments today to gain a clearer, data-driven picture of your students’ academic journey. Take a look at the video below to learn more.
This blog post was drafted with the help of Google Gemini and Gemini Notebook to help organize and flesh out my thoughts and ideas regarding how to get started using the new tag learning goals feature in Google Classroom. I also used NotebookLM to generate a brief audio overview, perfect for those who want to listen and learn on the go.
If you enjoy this blog, you’ll love our new book, History Matters in an AI Era. Available now on Amazon, this book shares practical, research-based strategies for integrating technology into history lessons. You’ll learn how to use technology to increase student engagement and curiosity. Click here to get your copy today.
Tech Coach Juarez
You cannot spell teach without tech.