-
From One-Off Visits to Ongoing Support: The Power of Intentional Follow Up
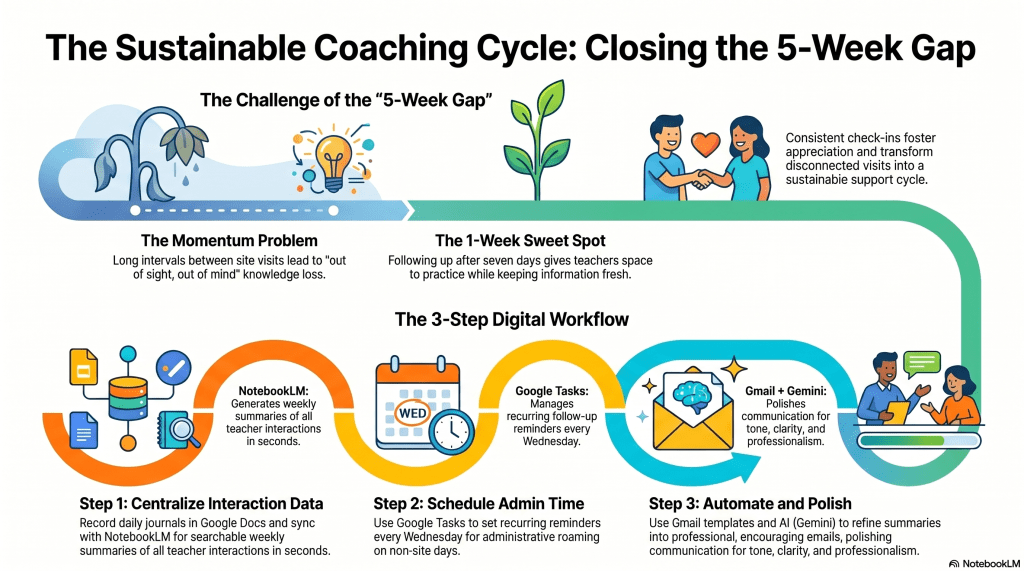
Created with the help of NotebookLM - Establish a consistent follow-up routine—roughly one week after coaching sessions—to help teachers retain information and maintain the momentum of technology integration.
- Utilize a streamlined digital workflow by logging interactions in Google Docs, using NotebookLM to generate interaction recaps, and employing Gmail templates to send timely, polished messages.
- Build stronger relationships by transforming infrequent site visits into a sustainable cycle of ongoing, actionable support that encourages educators to reach out for further help.
As an instructional technology coach, I work hard to support educators and introduce new technology strategies, yet maintaining that momentum is often difficult. Since I support a large number of teachers across roughly twenty schools, I am only able to visit each site every five weeks. This gap creates a significant problem for me. With so many demands on a teacher’s time and attention, the progress made during a coaching session can easily be lost. It becomes a classic case of out of sight, out of mind.
To bridge this gap, I developed a system to check in with educators about a week after our coaching session. This timeframe is intentional. It gives teachers enough space to process the new information and try it out in the classroom while keeping the experience fresh in their memory. The feedback I receive has been mainly positive. Teachers frequently mention that they appreciate the reminder because they would have otherwise forgotten small but important details. This simple act of consistency has helped me build much stronger relationships with the educators I support.
My workflow relies on a few key digital tools to keep everything organized. I maintain detailed notes in Google Docs for every coaching interaction, keeping a specific journal for each school that lists the date, the teacher, and a recap of our conversation. After each day, I sync these journals with Google’s NotebookLM. This allows me to keep all my coaching data centralized and easily searchable.
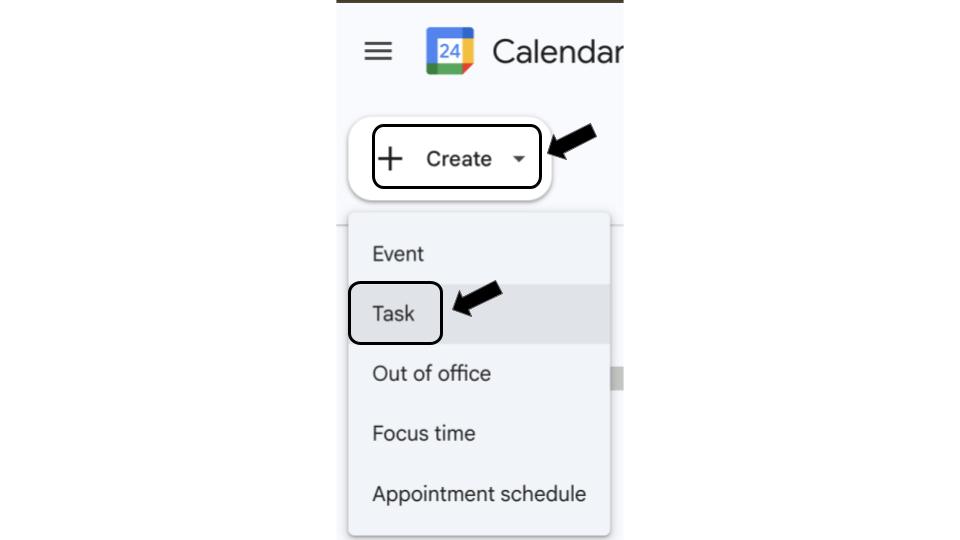
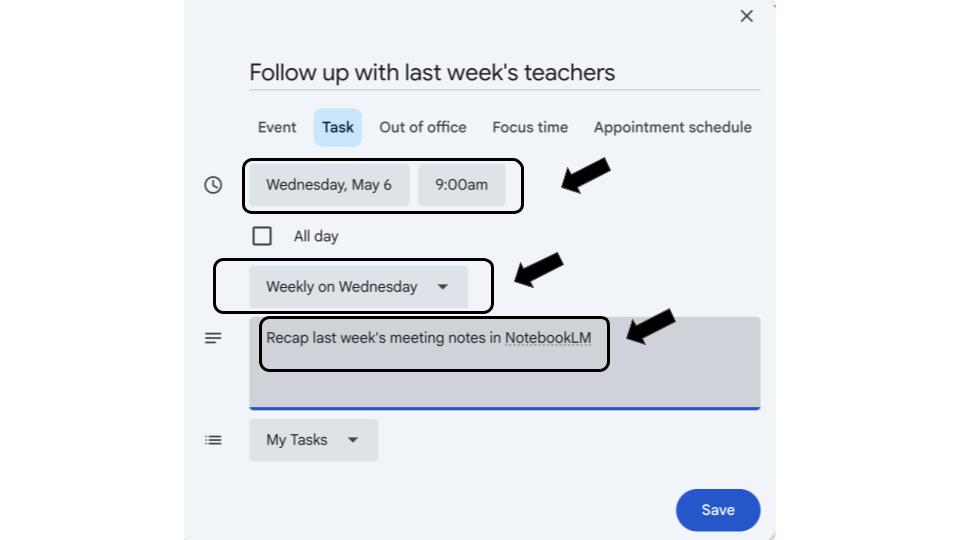
To manage the follow-up process, I use Google Tasks within my calendar. I set a recurring reminder every Wednesday. Since Wednesdays are when I am not at a specific site, this day is perfect for roaming or administrative tasks. During this time, I prompt my notebook in NotebookLM to provide a summary of the interactions from the previous week. It generates a recap of everyone I worked with in seconds.
Once I have the summary, I go to Gmail. I have created a template specifically for coaching follow-ups. The structure of the email stays the same, and I simply paste the relevant recap and add the dates and names. I also utilize my district-sponsored subscription to Gemini, which allows me to polish the message for clarity and tone. This functionality is located conveniently within Gmail. (If your subscription does not provide this function directly in Gmail, you can accomplish the same goal by opening Gemini in a separate tab and prompting it to polish your message.) This step ensures that my communication is professional and encouraging.
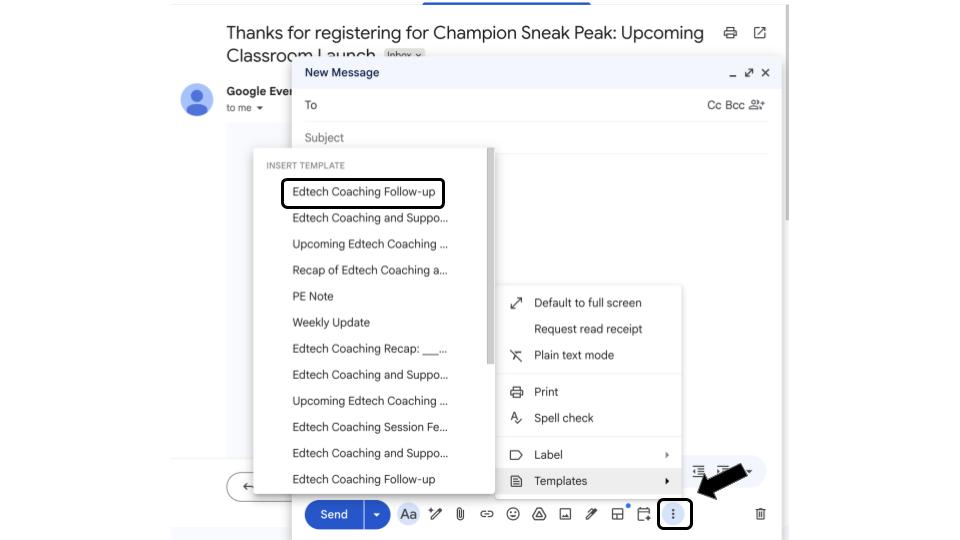
Find or create templates by clicking the three dots in bottom right corner 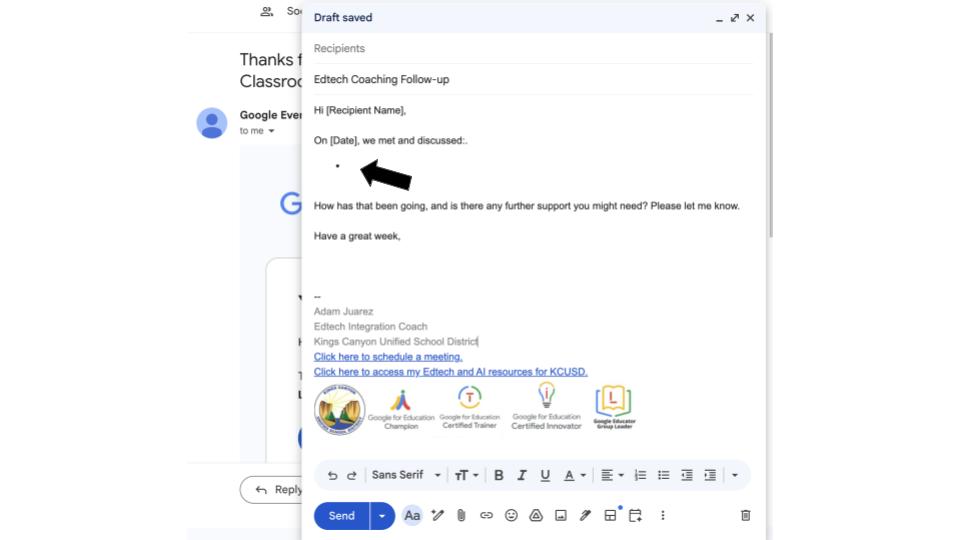
Find the placeholder in the template 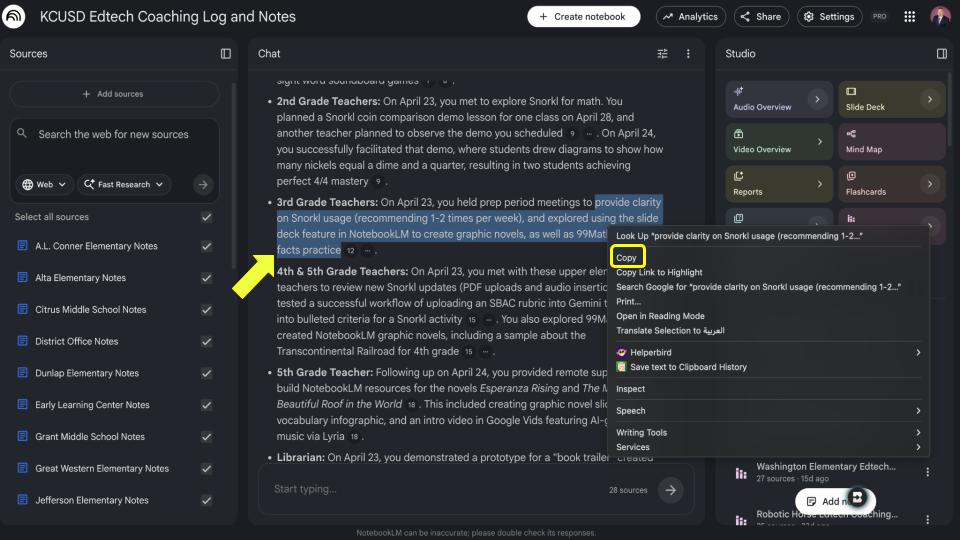
Copy the recap from NotebookLM and paste into the Gmail template 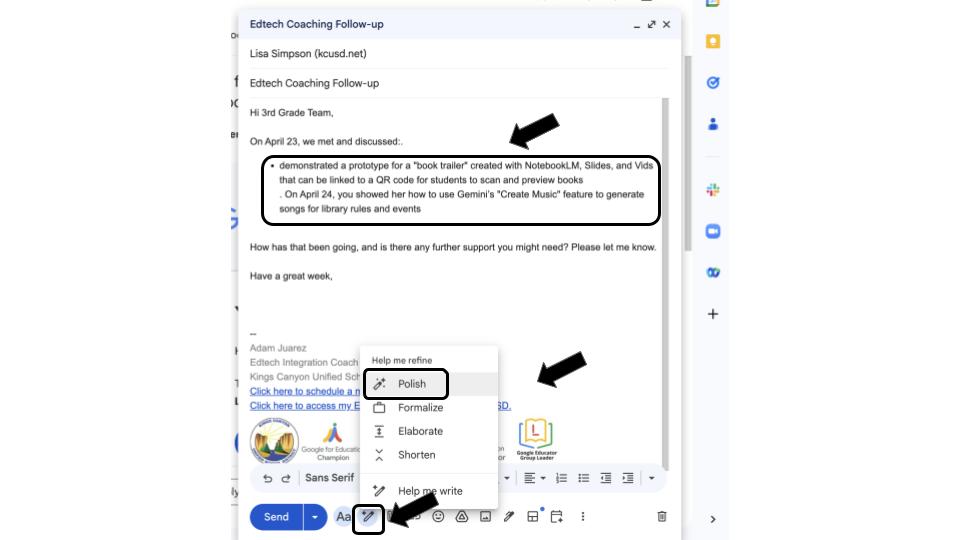
Click the Gemini button in Gmail to polish the message 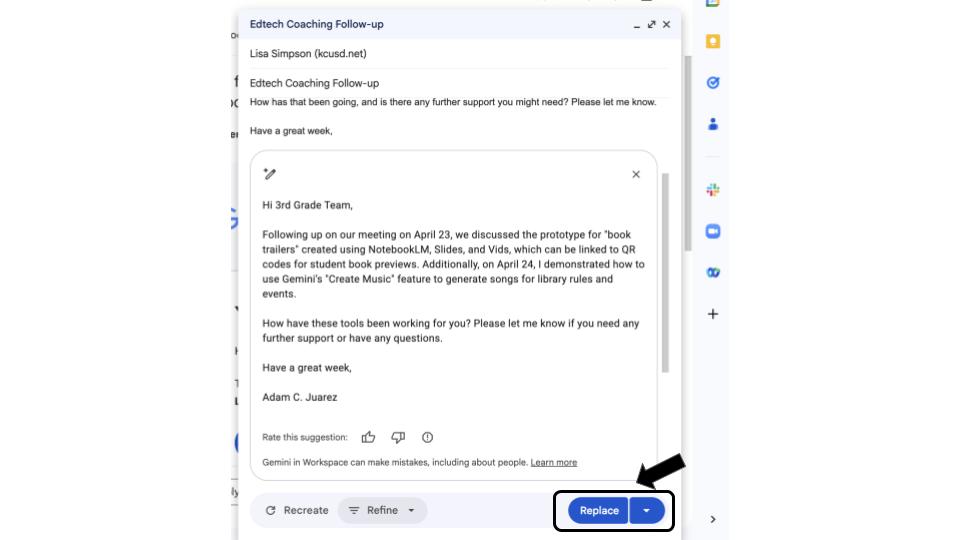
Review the polished message before Replacing 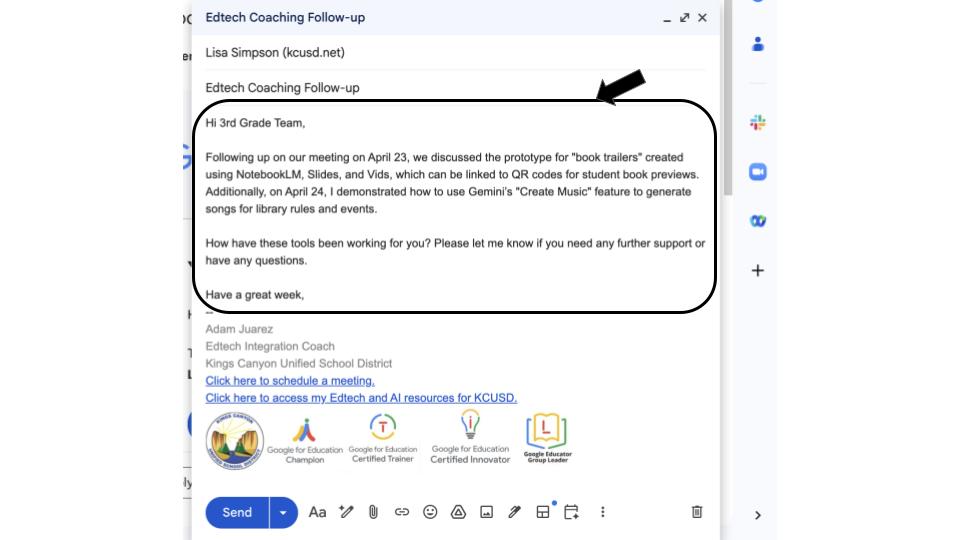
Your polished follow-up message to a teacher
By the end of the day, I usually receive several responses. Often, teachers express gratitude for the support or ask for further guidance. This system has transformed my coaching practice from a series of disconnected visits into a sustainable cycle of ongoing support. It keeps the learning active and ensures that the technology integration we discuss takes root in the classroom. By being intentional with my follow-up, I can make a lasting difference in the success and classroom experience of my teachers.
This blog post was drafted with the help of Google Gemini to help organize and flesh out my thoughts and ideas regarding how I use a variety of tech tools to manage my instructional coach workflow and follow up with educators. I also used NotebookLM to generate a brief audio overview, perfect for those who want to listen and learn on the go.
If you enjoy this blog, you’ll love our new book, History Matters in an AI Era. Available now on Amazon, this book shares practical, research-based strategies for integrating technology into history lessons. You’ll learn how to use technology to increase student engagement and curiosity. Click here to get your copy today.
-
Creating Graphic Novels and Videos with NotebookLM
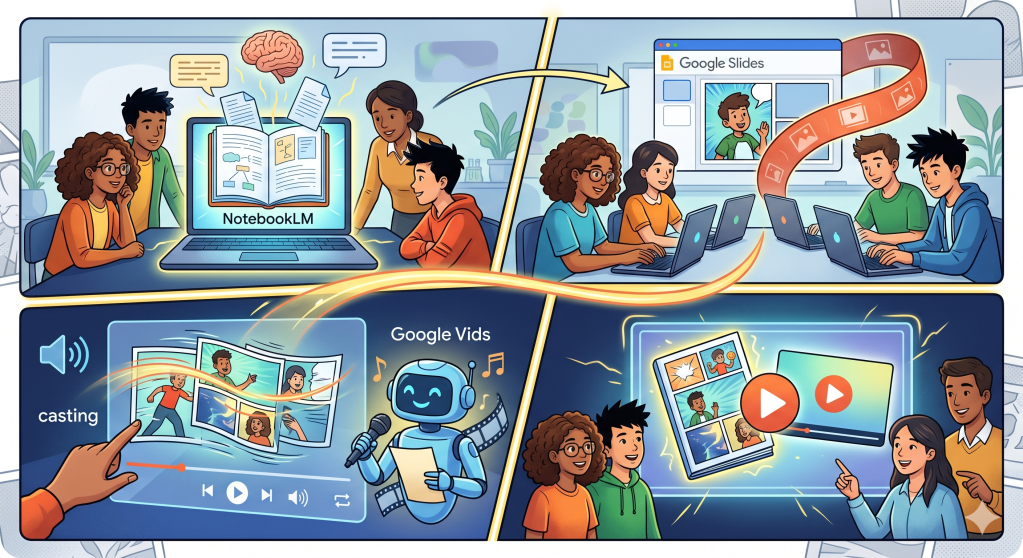
- Organize and Generate: Upload up to 50 sources into NotebookLM and use a specific prompt to generate a readable graphic novel slide deck for a target grade level.
- Convert to Slides: Download the project as a PowerPoint and upload it to Google Drive to automatically convert it into a Google Slides presentation.
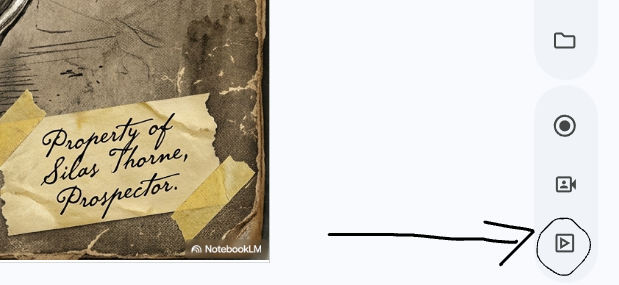
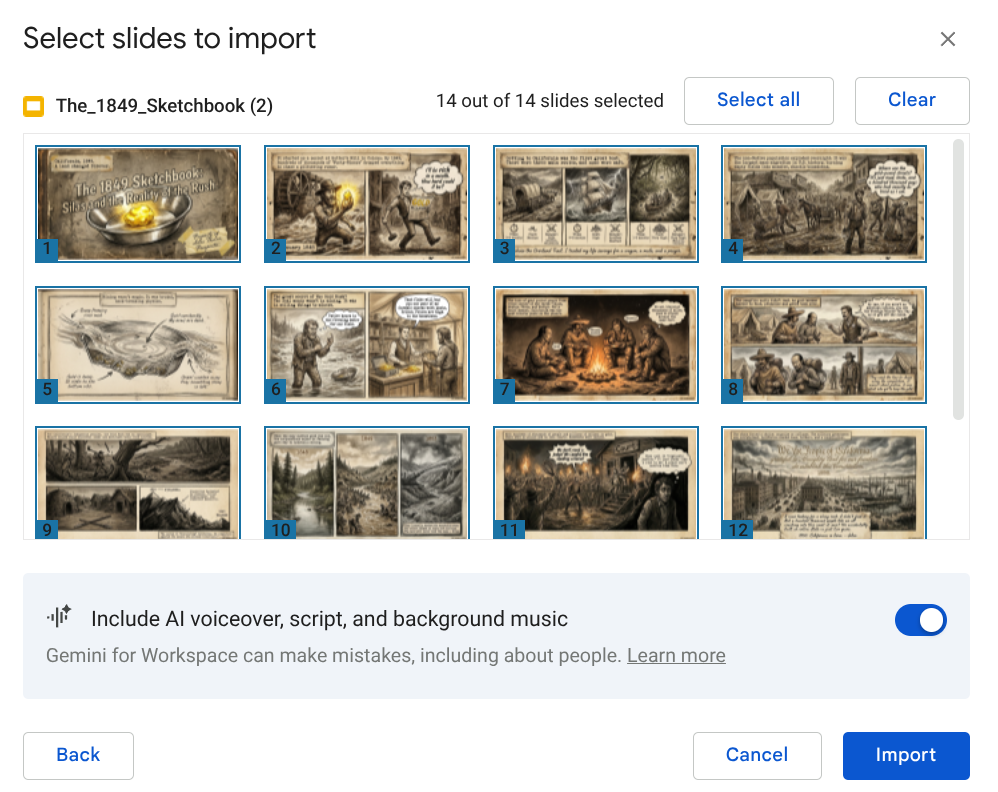
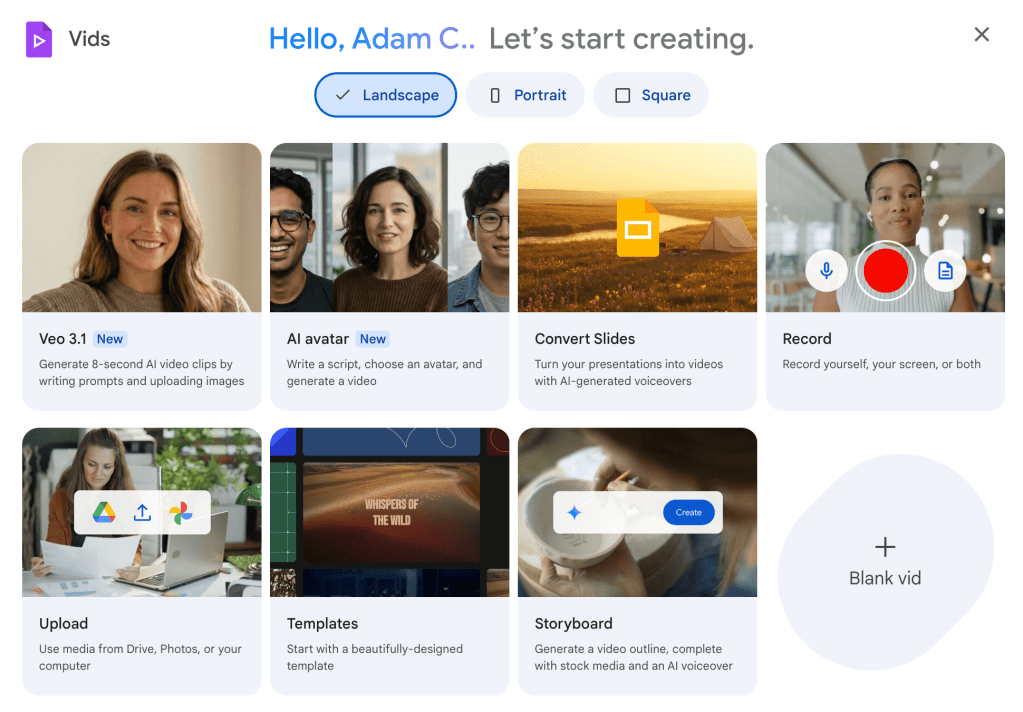
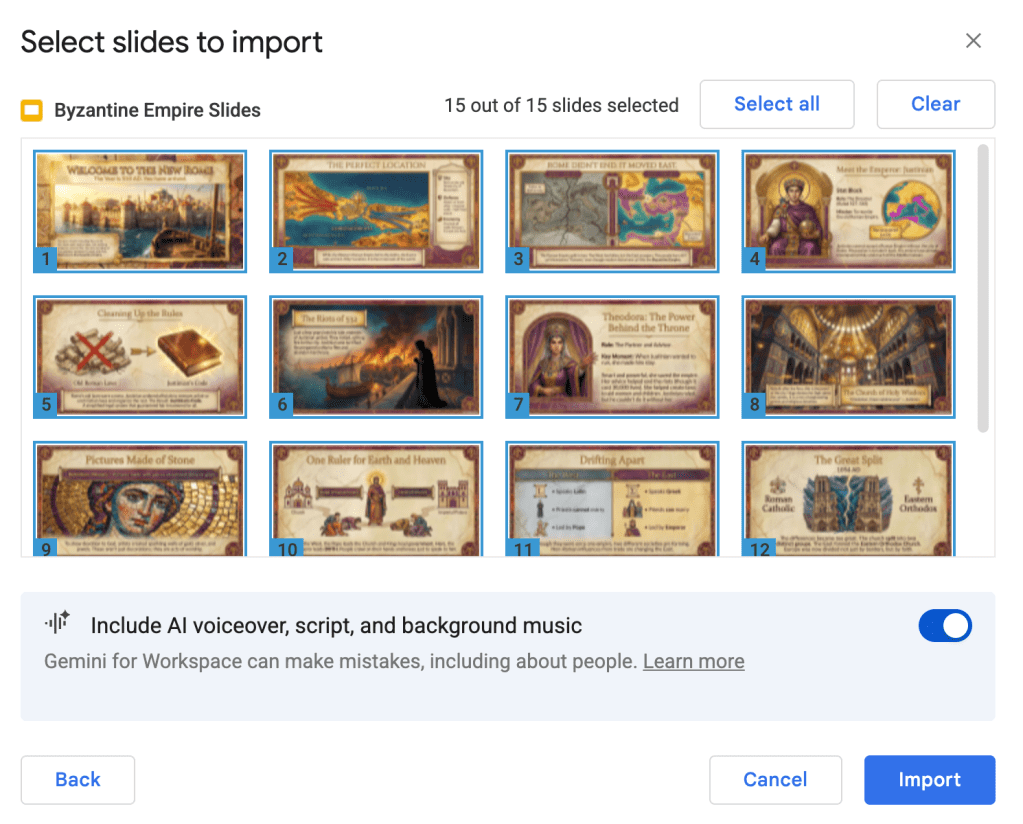
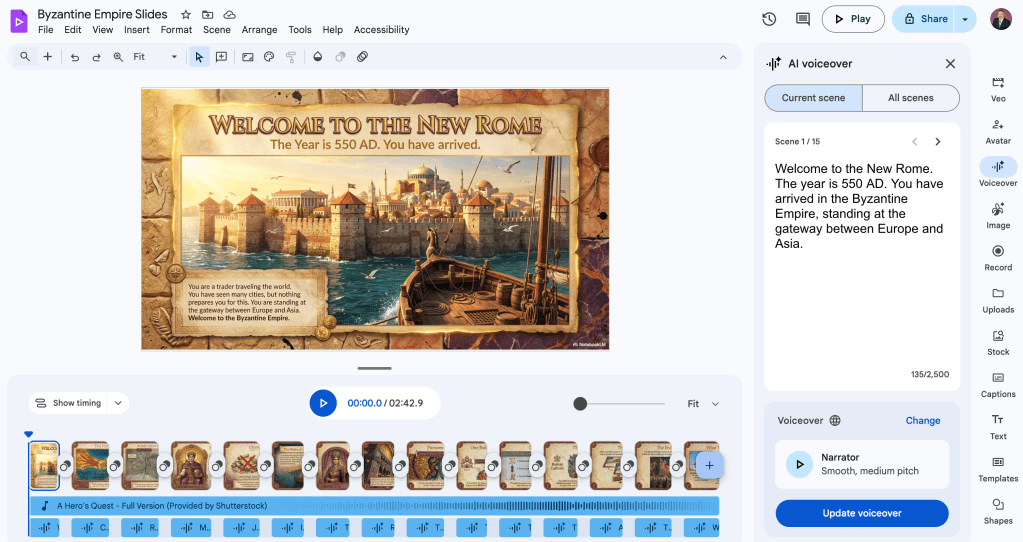
- Transform into Video: Use Google Vids to import the slides and automatically add an AI voiceover, script, and background music to create a polished MP4 video.
In the evolving landscape of educational technology, finding tools that genuinely engage students while simplifying the creative process is essential. One of the most dynamic ways to bring content to life is through the creation of graphic novels and accompanying videos. This process, which combines NotebookLM, Google Slides, and Google Vids, offers educators a practical and innovative way to help students explore complex topics in an engaging visual format.
The journey begins with NotebookLM, where you can organize your source material. Whether you are teaching a lesson on the California Gold Rush or a specific science concept, you can upload up to 50 different sources to inform your project. Once your sources are set, the next step is to use the slide deck feature. By providing a specific prompt, such as asking the tool to create a completed and readable graphic novel for a specific grade level, you can generate a series of dynamic images that read just like a traditional graphic novel. It typically takes between five and ten minutes to generate a full deck of 10 to 15 slides.
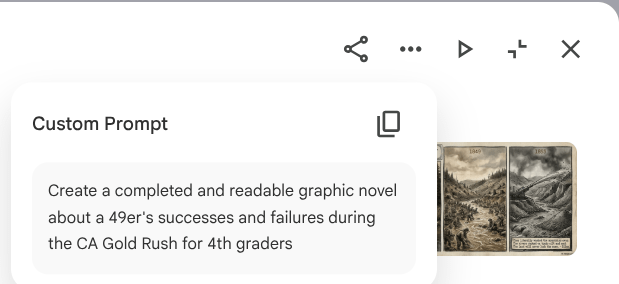
Use this prompt stem verbatim: Create a completed and readable graphic novel
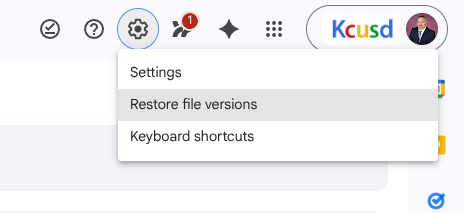
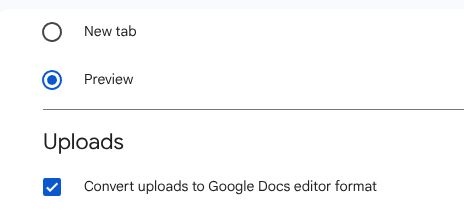
Add your details and context after.After generating your slides in NotebookLM, you can download the project as a PowerPoint file. To move this into the Google ecosystem, simply upload the file to Google Drive. A helpful tip is to ensure your Drive settings are configured to automatically convert uploaded files to Google Docs editor format. This ensures your graphic novel is ready to use as a Google Slides presentation immediately upon upload. (You will only have to configure this setting once.) While the images themselves are static, you can use the revise tool within the original platform to make specific changes to text or imagery before the final export.
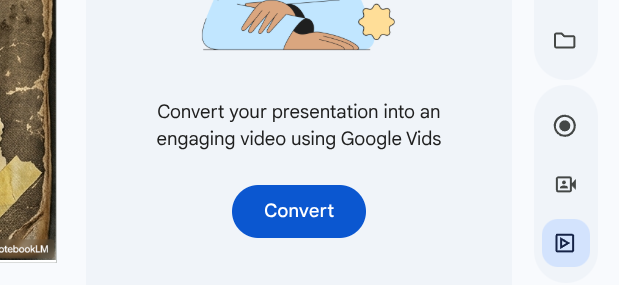
The most exciting part of this workflow is the integration with Google Vids. From within Google Slides, you can select the convert to video option, which imports your project into Google Vids. This tool takes your static graphic novel and transforms it into an engaging video complete with an AI voiceover, a script, and background music. Each slide becomes its own scene, and the entire video is typically between two and three minutes long.
The final video is fully editable, allowing you to refine the AI-generated script or adjust the timing of each scene to better fit your educational goals. Once you are satisfied with the result, the video can be downloaded as an MP4 file. This makes it incredibly easy to share with students through Google Classroom or YouTube. By following this streamlined process, you can provide your students with engaging learning material that is both supportive of their academic growth and polished.
Watch this video to learn the workflow This blog post was drafted with the help of Google Gemini to help organize and flesh out my thoughts and ideas regarding how to create graphic novels and accompanying videos with NotebookLM, Google Slides, and Google Vids. I also used NotebookLM to generate a brief audio overview, perfect for those who want to listen and learn on the go.
If you enjoy this blog, you’ll love our new book, History Matters in an AI Era. Available now on Amazon, this book shares practical, research-based strategies for integrating technology into history lessons. You’ll learn how to use technology to increase student engagement and curiosity. Click here to get your copy today.
-
Timing Your Success with the Slides Timer Extension
- Pacing Issues: Helps educators stay on track during lesson or presentations.
- Easy Setup: Uses simple text commands to embed timers directly onto slides.
- Visual Management: Provides clear countdowns or clocks for both teachers and students.
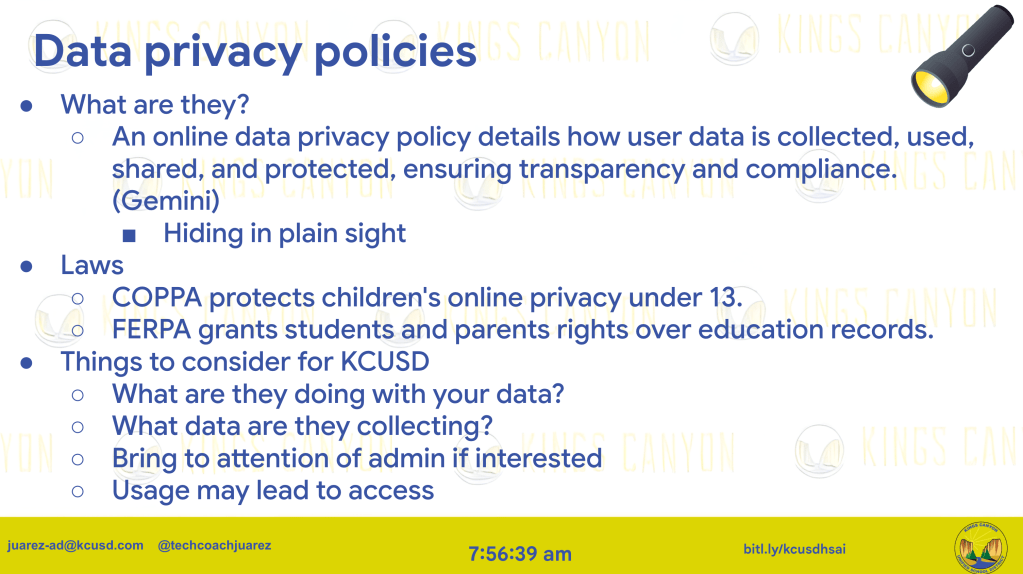
Pacing is one of the most challenging aspects of teaching. Whether you are leading a classroom of students or facilitating professional learning for your peers, it is incredibly easy to lose track of time. We often find ourselves deeply immersed in a compelling story, navigating a complex student question, or managing the unexpected distractions that are simply part of a school day. While these moments are valuable, they can leave you rushing through your final slides or missing key learning objectives.
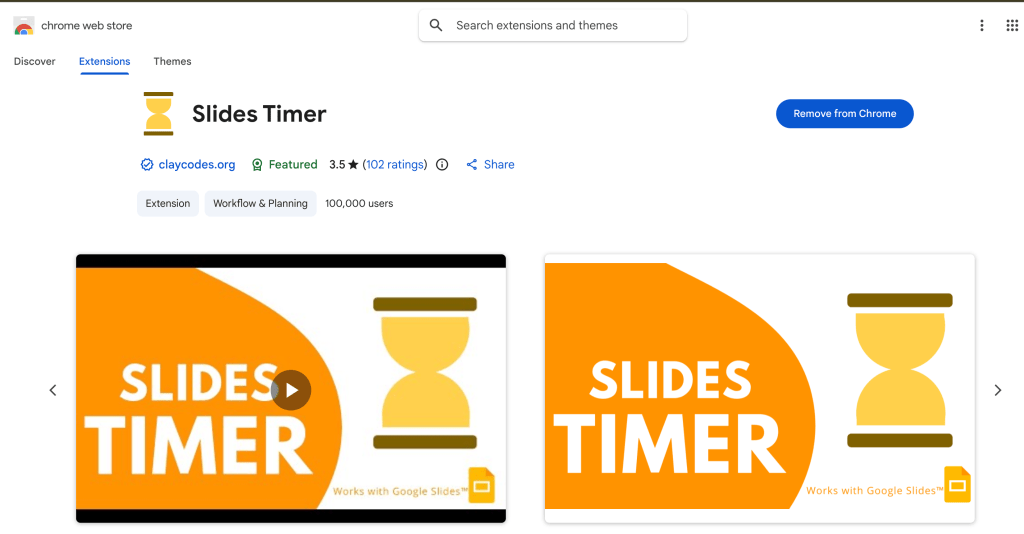
The Slides Timer Chrome extension offers a practical and free solution (there is also a paid version) to help you maintain your cadence. This tool allows you to embed functional timers directly into your Google Slides presentations, ensuring that your pacing remains visible to both you and your audience without the need to toggle between different browser tabs or physical stopwatches.
How it Works
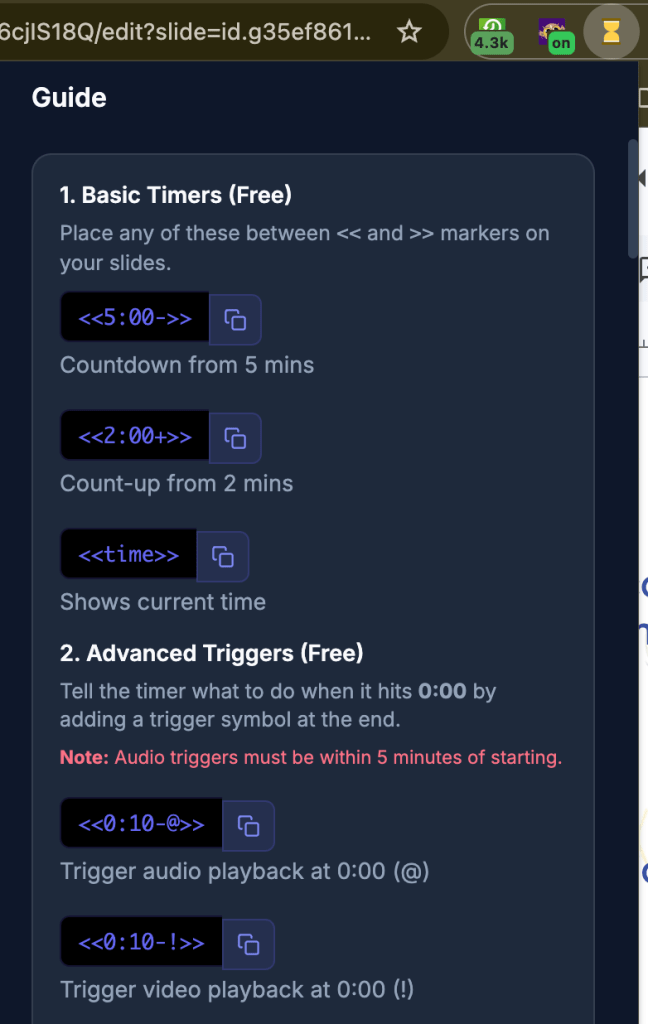
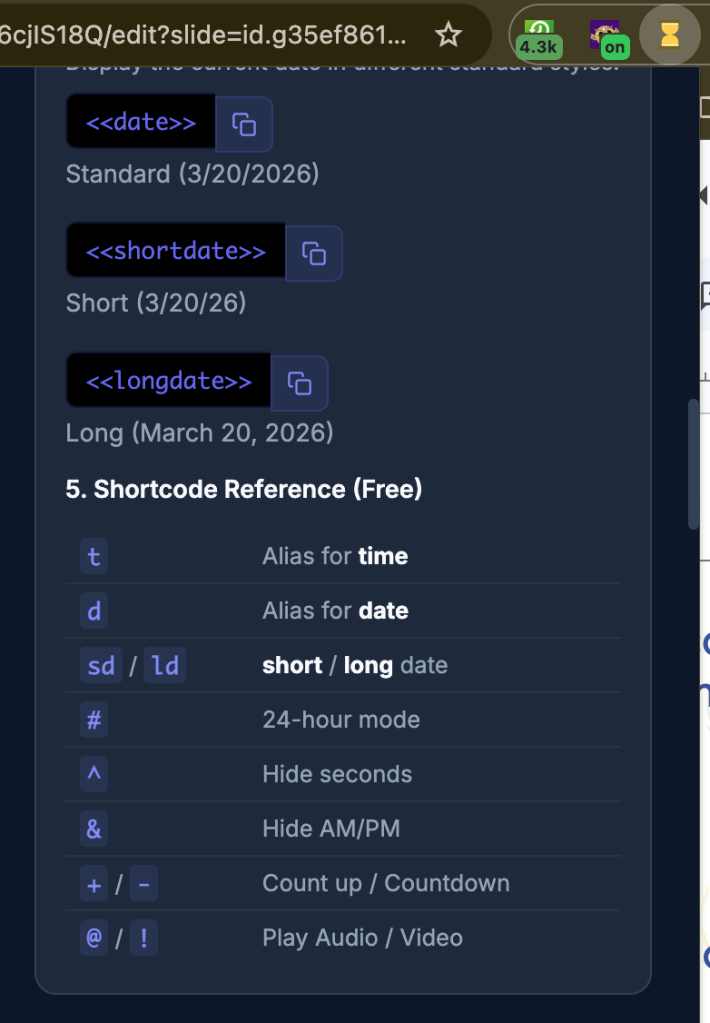
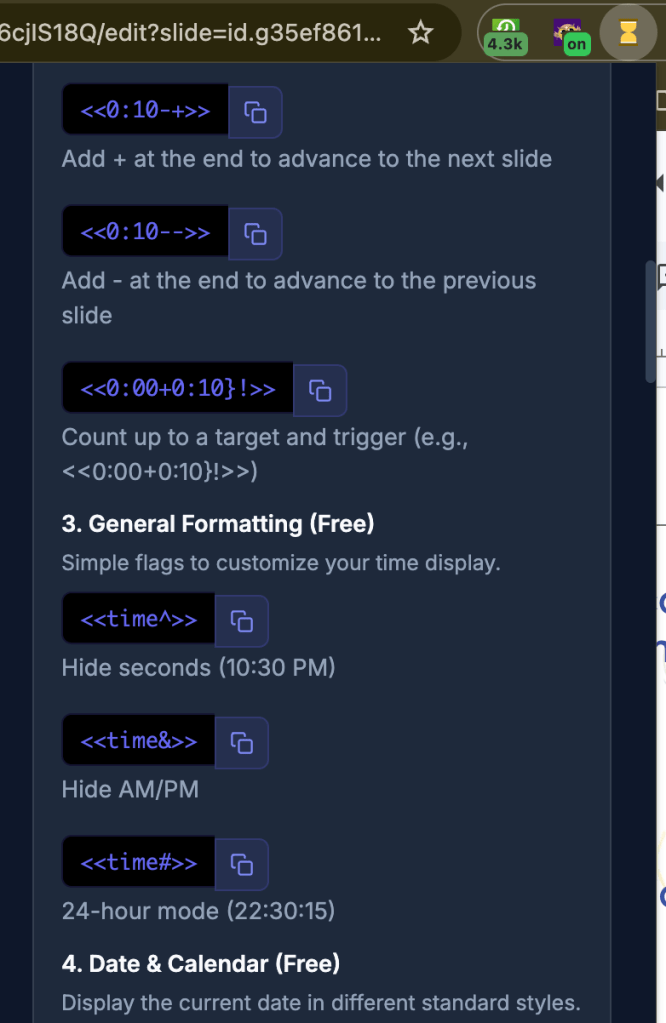
Once you have installed the extension from the Chrome Web Store, it operates through simple text commands. You do not need to navigate complex menus or embed external code. Instead, you simply create a text box on any slide where you want a timer to appear. By typing specific symbols and numbers into that text box, the extension transforms your text into a live, functioning timer once you enter present mode.
For instance, you can create a countdown timer for a five-minute brain break or a small group activity. You can also set a count-up timer to track how long a specific discussion takes. Additionally, you can display a real-time clock on your slides, which is particularly helpful during longer presentations to ensure you are staying aligned with the overall schedule of the day.
Practical Classroom Applications
Integrating these timers can significantly change the energy of your classroom. During a lesson, a visible countdown timer provides students with a clear expectation of how much time remains for a task, which helps them develop better time-management skills. For the educator, having a clock or timer on the screen acts as a gentle, non-intrusive reminder to wrap up a section and move forward.
By using this simple tool, you can protect the time needed for every part of your lesson. It allows you to address questions and engage in storytelling with the confidence that you have a reliable visual cue to keep you on track.
This blog post was drafted with the help of Google Gemini to help organize and flesh out my thoughts and ideas regarding how to use the Slides Timer Chrome Extension to help with pacing of lessons and presentations. I also used NotebookLM to generate a brief audio overview, perfect for those who want to listen and learn on the go.
If you enjoy this blog, you’ll love our new book, History Matters in an AI Era. Available now on Amazon, this book shares practical, research-based strategies for integrating technology into history lessons. You’ll learn how to use technology to increase student engagement and curiosity. Click here to get your copy today.
-
From Paper Folds to Digital Nets
Enhancing Surface Area Lessons with Simple Tech
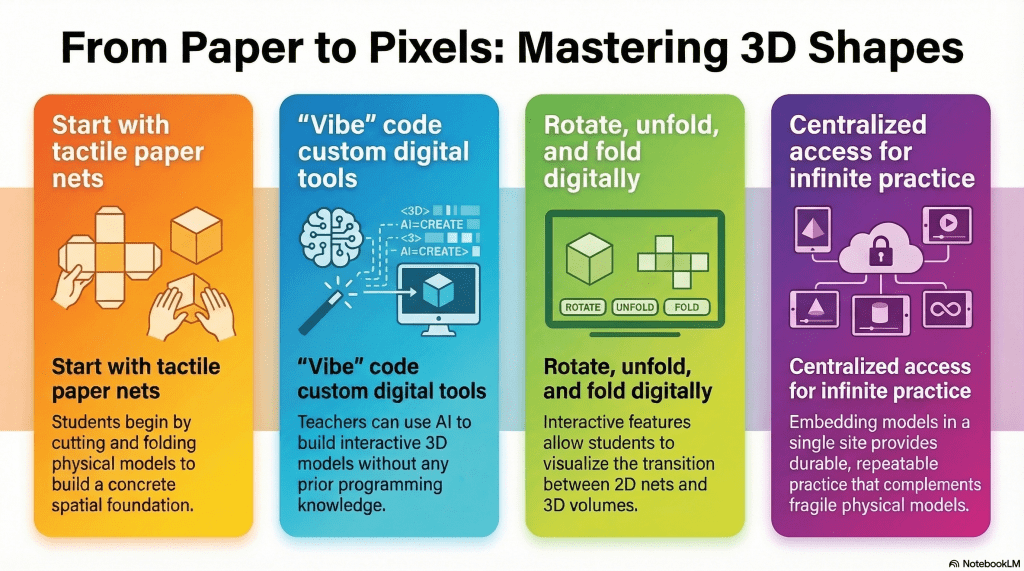
- Physical Practice: Sixth graders used paper nets to physically build 3D polygons, establishing a tactile understanding of surface area.
- Digital Translation: Interactive 3D models were created using simple language prompts in Google Gemini without any formal coding knowledge.
- Reinforced Learning: These digital shapes were hosted on a Google Site, allowing students to virtually fold and rotate models to bridge 2D and 3D concepts.
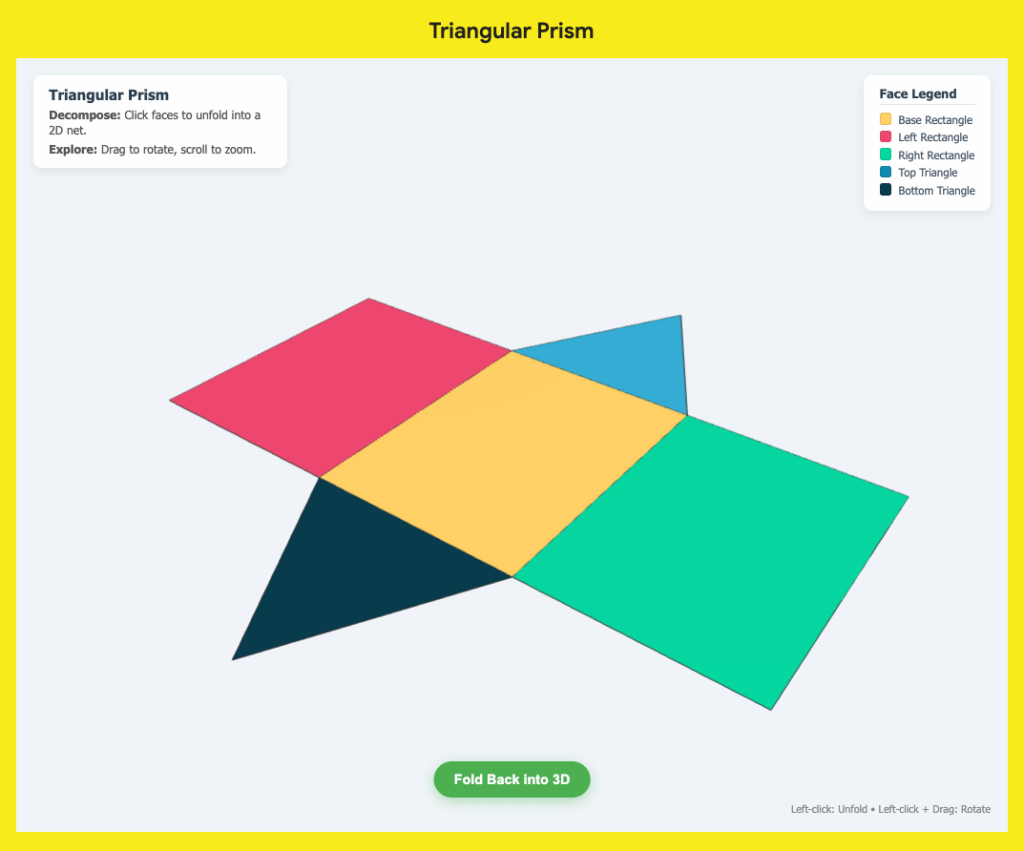
The transition from 2D shapes to 3D thinking is a significant leap for many sixth-grade students. In a recent classroom observation, I watched an educator masterfully bridge this gap. The lesson focused on the Net Method for calculating the surface area of cubes, pyramids, rectangular prisms, and triangular prisms. The approach was tactile and effective. After some direct instruction, students cut out paper nets and physically folded them into 3D objects. This hands-on experience provided a solid foundation, but it also sparked an idea for how technology could further reinforce this spatial reasoning.
While physical models are indispensable, they can sometimes be fragile or difficult to manipulate repeatedly. This led me to explore how accessible AI tools could help a teacher create a digital companion for this lesson. Even without any background in computer programming, it is now possible to build interactive tools through a process often called “vibe” coding. By simply describing my vision to a tool like Google Gemini, I was able to develop a set of interactive 3D models tailored specifically to this math objective.

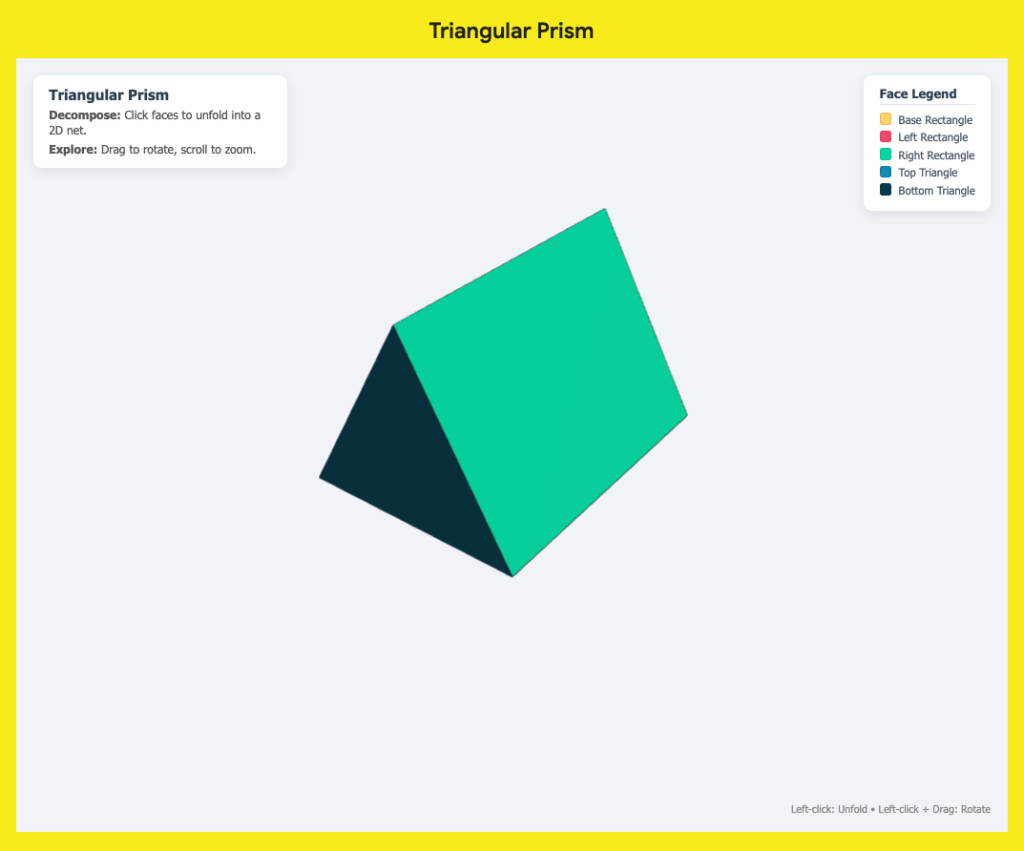
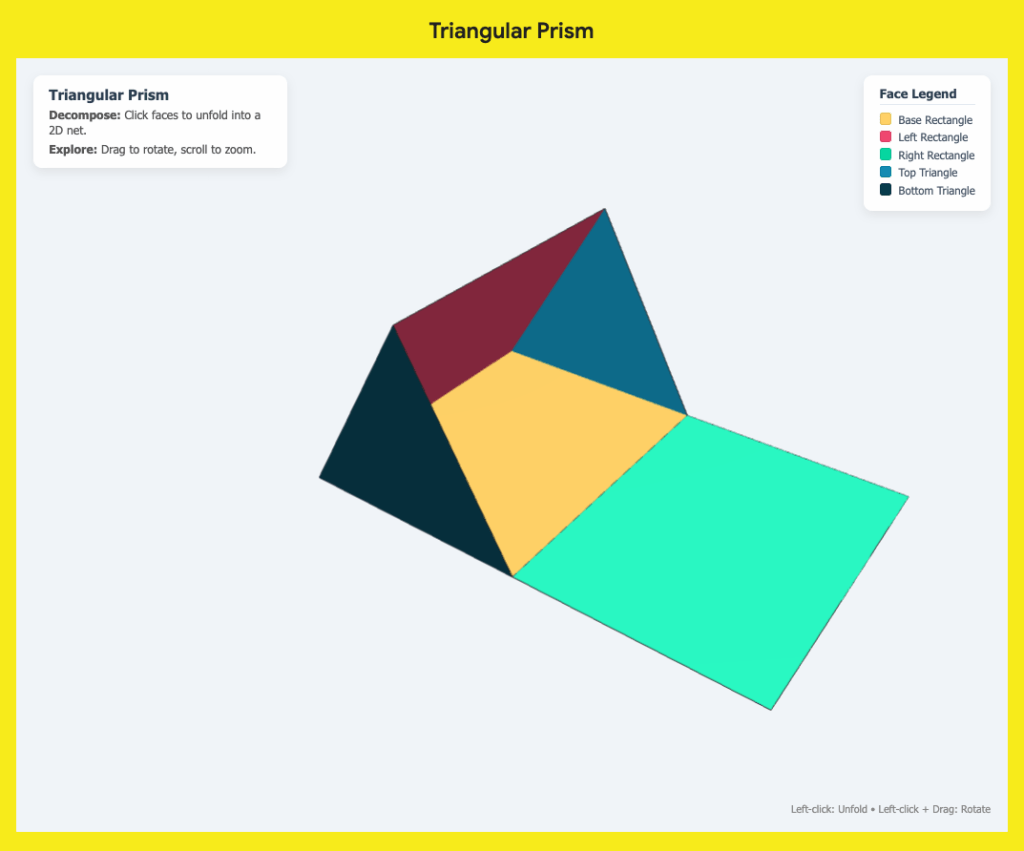
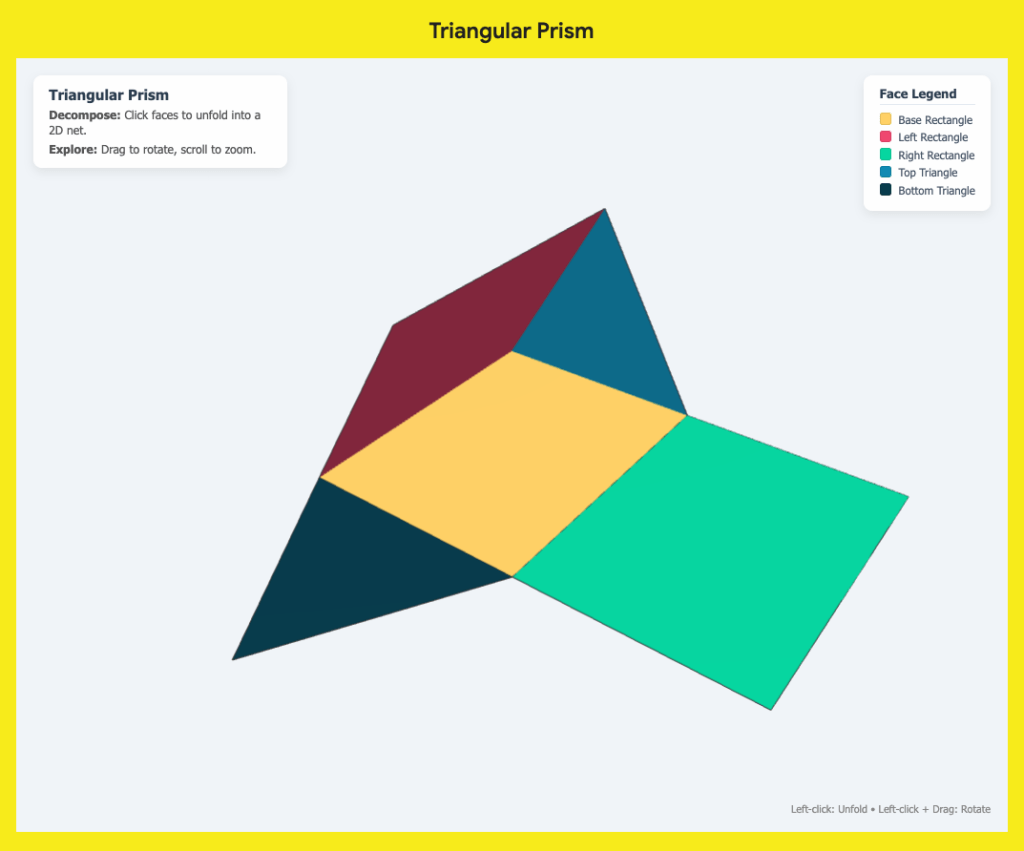
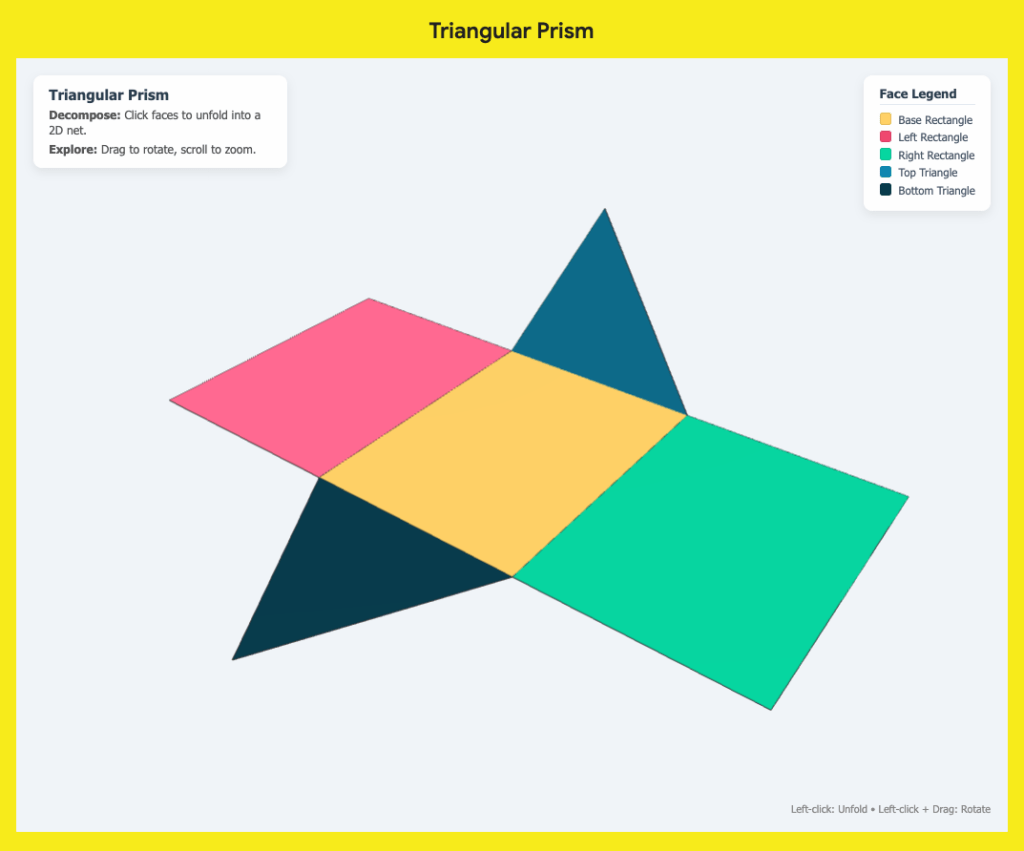
Vibe Coding with Gemini The goal was to create a digital version of the paper activity. I instructed the AI to generate models of the four shapes that students could rotate 360 degrees. This allowed for a full view of every face and vertex. To mirror the classroom activity, I requested a feature where clicking on a side would cause the model to unfold one side at a time into its 2D net. Once the students could see the flattened shape, a simple button would allow them to fold it back into its 3D form.
To make these tools easily accessible for the classroom, I embedded the resulting code for each model into a single Google Site. (All I had to do was use the embed tool for each model and paste the respective code.) Having all four shapes on one page meant the teacher could provide a single link to the students. This digital resource served as a perfect follow-up to the physical cutting and folding. Students who might have struggled with the precision of paper models could now interact with the shapes infinitely, observing the relationship between the flat faces and the volume they enclose.
The beauty of this integration is that it does not replace the hands-on experience. Instead, it honors the work students did with their guided notes and scissors while providing a modern way to practice. For educators, this highlights a shift in how we can approach edtech. You do not need to be a coder to create custom, high-quality digital manipulatives. You only need a clear pedagogical goal and the willingness to describe it.
When we combine tactile learning with interactive digital models, we can provide students with multiple pathways to understand complex geometric concepts. This teacher’s excitement to use the website was a reminder that the best technology serves the lesson, reinforcing the skills students have already begun to master with their own two hands.
This blog post was drafted with the help of Google Gemini to help organize and flesh out my thoughts and ideas regarding how to vibe code with Gemini to build 3D, interactive models of polygons, reinforcing the concept of the net method. I also used NotebookLM to generate a brief audio overview, perfect for those who want to listen and learn on the go.
If you enjoy this blog, you’ll love our new book, History Matters in an AI Era. Available now on Amazon, this book shares practical, research-based strategies for integrating technology into history lessons. You’ll learn how to use technology to increase student engagement and curiosity. Click here to get your copy today.
-
Turning Your Handwritten Notes Into Digital Power with NotebookLM
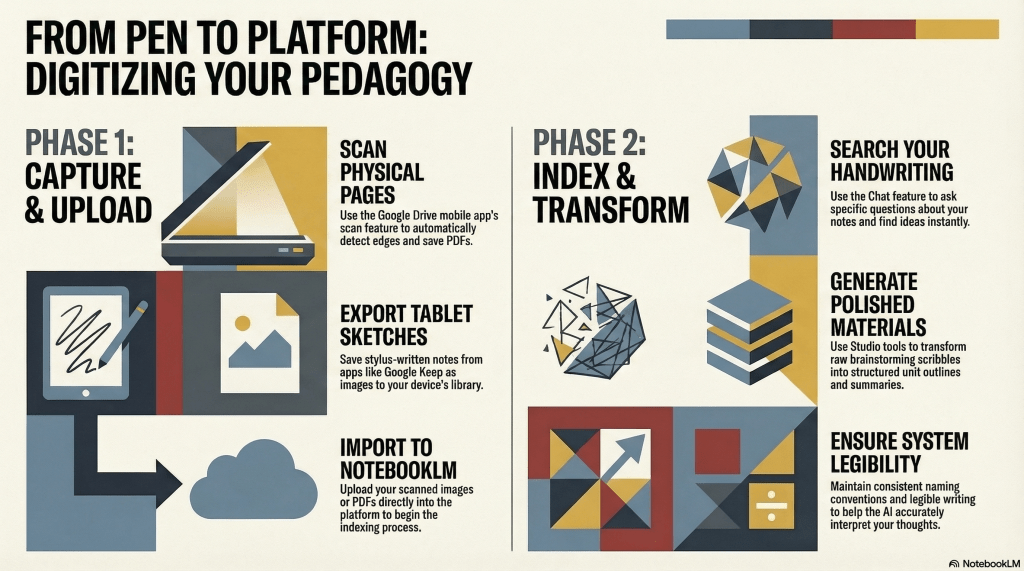
- Digital Integration: NotebookLM transforms handwritten or stylus-based notes into searchable digital assets through simple photos, scans, or screenshots.
- Effortless Organization: Tools like the Google Drive scan feature and Google Keep drawings make it easy to upload and categorize physical planning sessions.
- Actionable Insights: Once digitized, educators can use the Chat and Studio features to quickly summarize notes and generate new teaching materials.
Many educators still find that the physical act of writing is the most effective way to process new ideas or plan lessons. However, the struggle usually begins after the ink dries. Managing a stack of physical notebooks or trying to locate a specific thought from a meeting months ago can be a significant hurdle. If you prefer the tactile feel of a pen but feel overwhelmed by the lack of organization, NotebookLM offers a bridge between your handwritten world and digital efficiency.
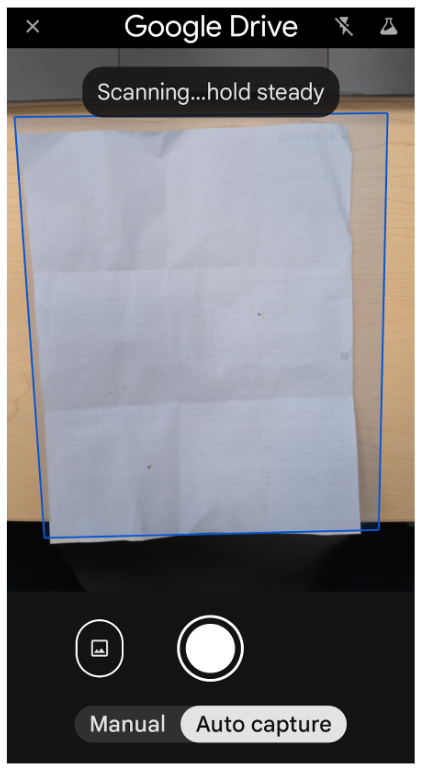
The transition from paper to a searchable digital database is simpler than it might seem. The primary requirement is capturing a clear image or scan of your writing. For those using traditional pen and pencil, your smartphone is your best tool. Taking a well-lit photo of each page works perfectly. Alternatively, you can use a dedicated scanner to export multiple pages into a single PDF or image file stored on your device or in the cloud.
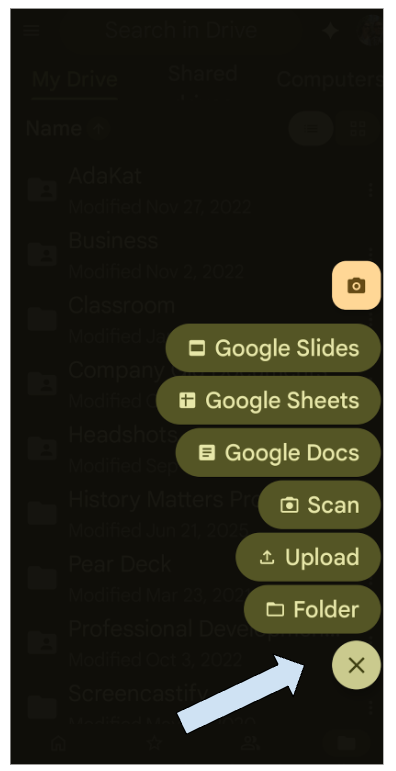
If you are a Google Drive user, the mobile app includes a built-in scan feature that is particularly helpful for this workflow. It automatically detects the edges of your paper and saves the document directly to your Drive, keeping your digital workspace tidy from the start.
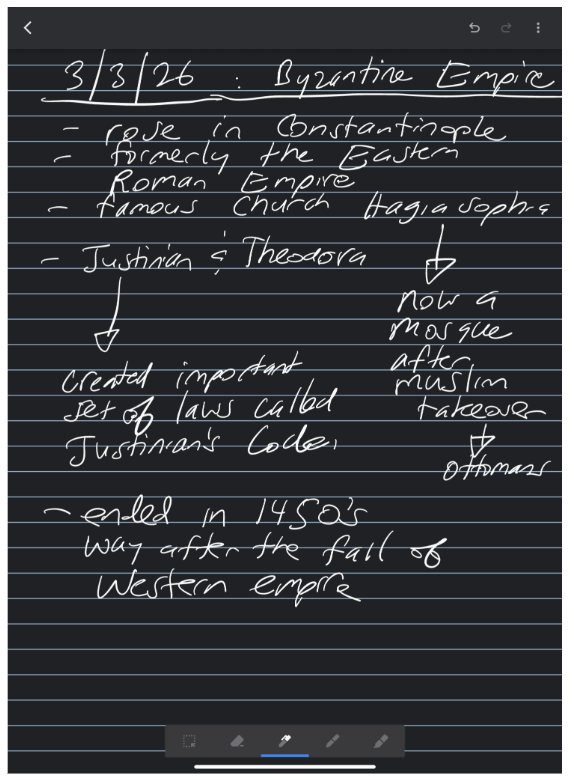
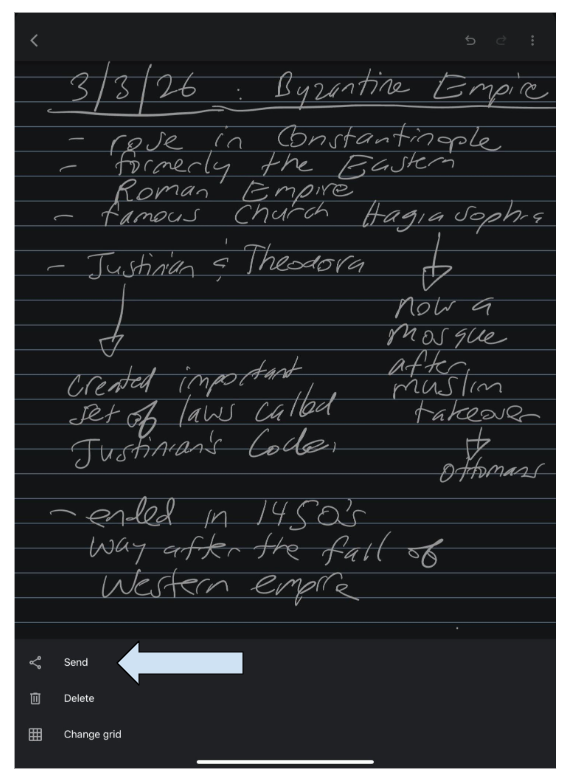
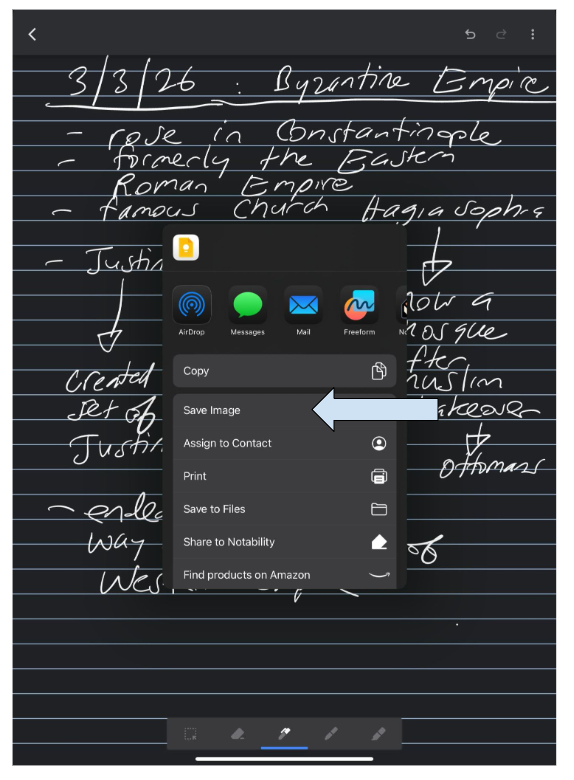
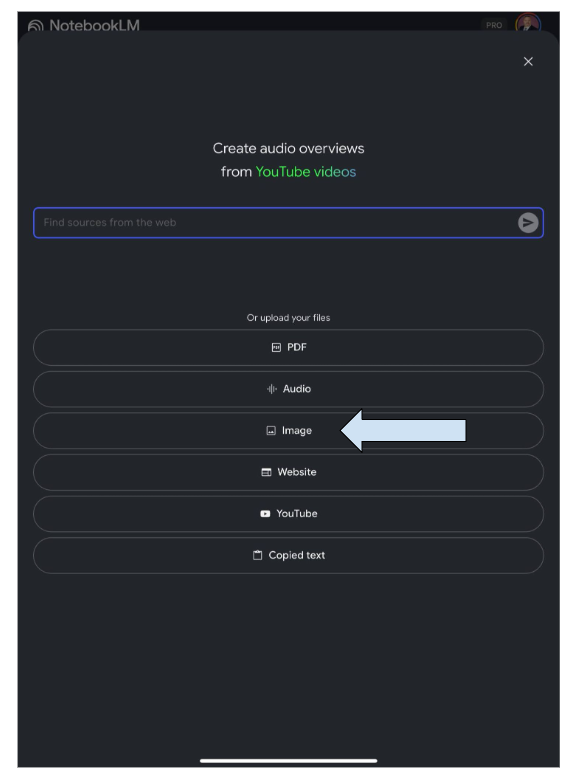
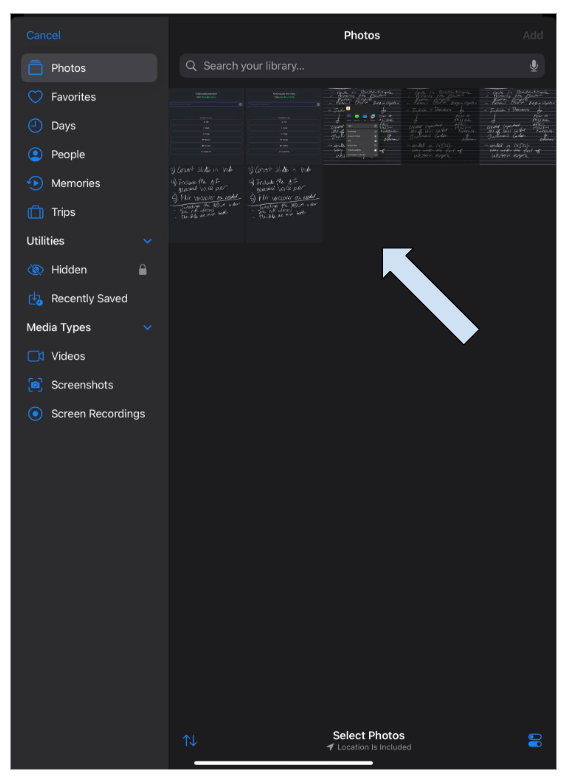
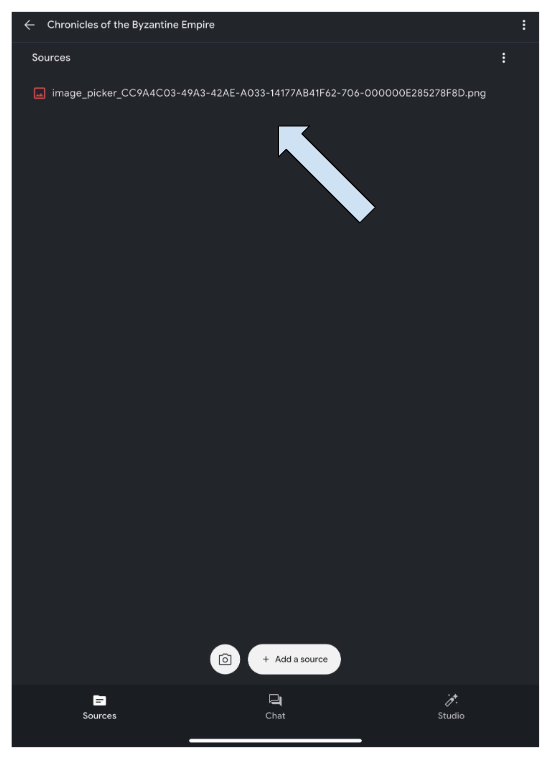
For teachers who have already moved to tablets but still use a stylus for that handwritten feel, the process is even faster. You can take screenshots of your notes and upload them directly. A specific method that works well is using Google Keep drawing notes. This tool provides a background that simulates ruled notebook paper, making the writing experience feel familiar. Once a page is finished, it can be exported to your image library and uploaded into NotebookLM.
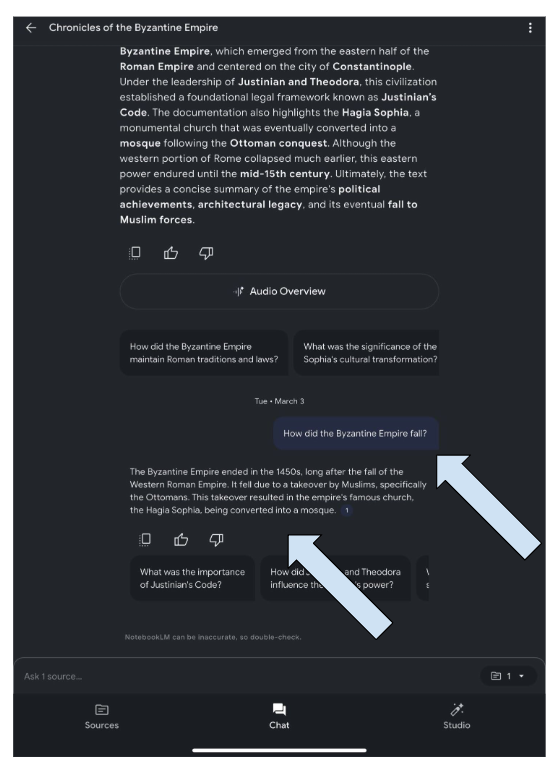
Once your handwritten notes are uploaded, the true potential of this technology is unlocked. NotebookLM can read and index legible handwriting, allowing you to use the Chat feature to ask specific questions about your own thoughts. Instead of flipping through hundreds of pages to find a specific curriculum idea, you can simply ask the assistant to find it for any notes you have uploaded.
Beyond just searching, you can use the various Studio tools within the platform to transform those raw notes into polished materials. You can ask the tool to summarize your brainstorming sessions or help you create engaging outlines for your next unit based on the scribbles from your planning period.
To get the most out of this system, consistency is key. Developing a clear naming convention for your uploaded images or scans will make a world of difference as your library grows. Additionally, while the technology is impressive, maintaining legible handwriting and using clear labels within your notes will ensure the software accurately interprets your ideas. By following these steps, you can keep the handwritten practice you love while gaining the organizational power of a digital assistant.
This blog post was drafted with the help of Google Gemini to help organize and flesh out my thoughts and ideas regarding how take use tools such as Gemini or NotebookLM to analyze and organize handwritten notes. I also used NotebookLM to generate a brief audio overview, perfect for those who want to listen and learn on the go.
If you enjoy this blog, you’ll love our new book, History Matters in an AI Era. Available now on Amazon, this book shares practical, research-based strategies for integrating technology into history lessons. You’ll learn how to use technology to increase student engagement and curiosity. Click here to get your copy today.
-
Customizing Video Content w/ NotebookLM and Google Vids
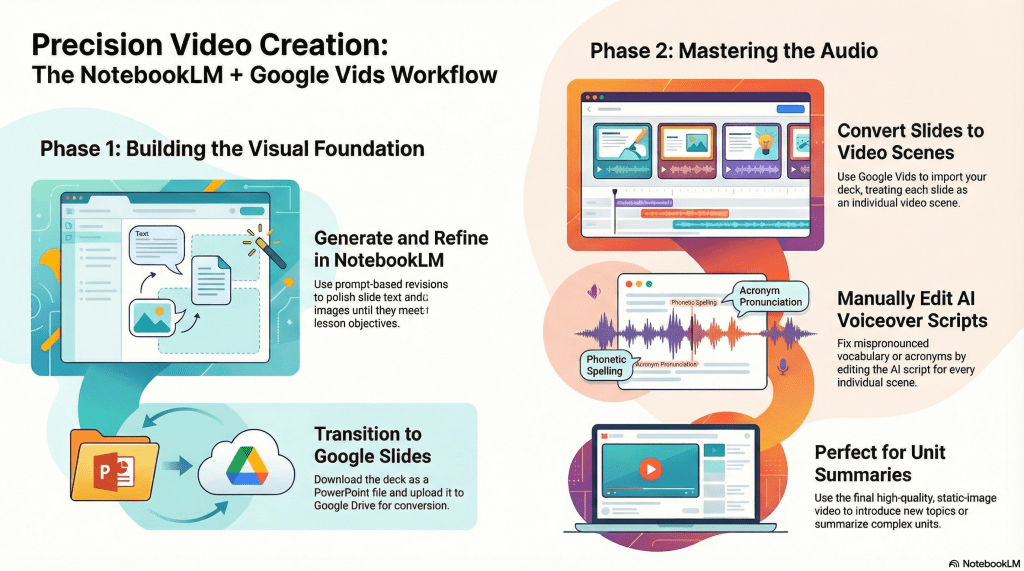
Created with NotebookLM - Identify the Gap: NotebookLM video overviews are great but currently lack the editing tools needed to fix audio errors like mispronounced words.
- The Slides Solution: Use the NotebookLM slide generator instead, as it allows for prompt-based text edits and easy export to PowerPoint or Google Slides.
- Precision with Google Vids: Convert those slides into a video within Google Vids to manually customize the AI voiceover script for every single scene.
Google NotebookLM has quickly become a favorite tool for educators looking to streamline content creation. While its ability to generate quick video overviews is impressive, many teachers have noted a common frustration: a lack of creative control. It is difficult to watch a generated video that mispronounces a key vocabulary term or fumbles a specific acronym, especially when there are currently no built-in editing features to fix those audio slips.
Fortunately, there is a practical workaround that gives you more authority over the final product. By shifting your focus from the video generator to the slide deck generator, you can leverage the best of NotebookLM while maintaining your professional standards for accuracy.
The Power of Precision in Slides
NotebookLM excels at creating organized, visually appealing slide presentations. Unlike the video tool, the slide generator recently added a prompt-based revision feature. This allows you to refine the text and images until they perfectly match your lesson objectives. Once the deck is polished, you can download it as a PowerPoint file.
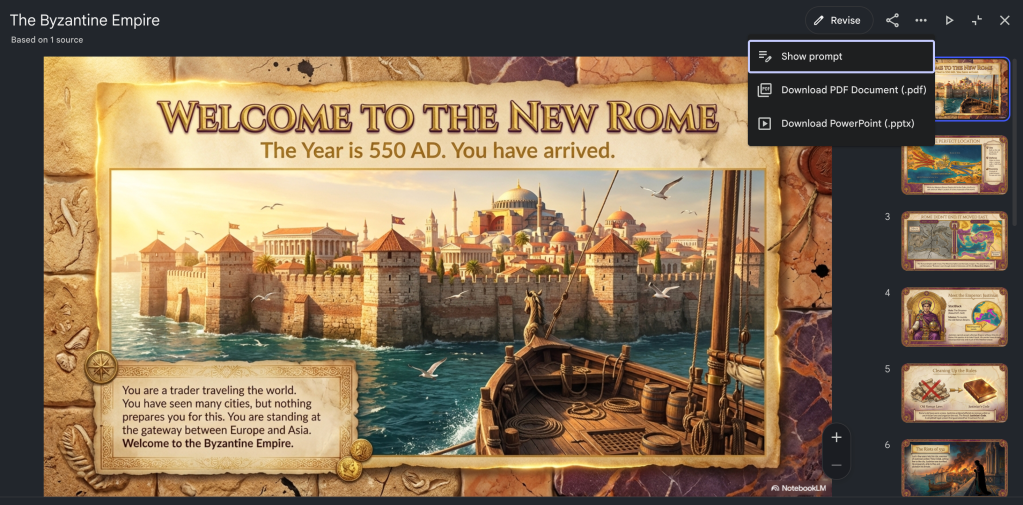
Click download PowerPoint To bring this into the Google ecosystem, simply upload that file to your Google Drive. If your settings are set to automatically convert uploads, it will become a Google Slides file instantly. This file serves as the sturdy foundation for a much more flexible video project.
Converting Slides with Google Vids
The real magic happens when you open Google Vids and select the option to convert slides. This tool treats each of your slides as an individual scene in a video timeline. The most valuable part of this process is the voiceover step. When prompted, choose to have the AI generate a voiceover for each slide.
Because you are working scene by scene, you can manually edit the script for the AI voice. This is where you can add essential content and fix any mispronunciations or clarify complex acronyms. You are no longer at the mercy of a one-take generator. You are the director ensuring the instructional content and audio is exactly right for your students.
Engaging Results for the Classroom
While the resulting videos are a series of static images rather than high-motion animation, the quality remains high. These videos are excellent for introducing new topics or providing a detailed summary of a unit. They combine the aesthetically appealing visual design of NotebookLM with your specific subject matter expertise.
By using this workflow, you can bridge the gap between automated convenience and instructional integrity. You provide your students with a professional, engaging resource that sounds exactly the way it should, ensuring that the focus stays on learning rather than on technical errors.
This blog post was drafted with the help of Google Gemini to help organize and flesh out my thoughts and ideas regarding how to generate videos with Vids based on slides created in NotebookLM. I also used NotebookLM to generate a brief audio overview, perfect for those who want to listen and learn on the go.
If you enjoy this blog, you’ll love our new book, History Matters in an AI Era. Available now on Amazon, this book shares practical, research-based strategies for integrating technology into history lessons. You’ll learn how to use technology to increase student engagement and curiosity. Click here to get your copy today.
-
Designing Dynamic Slides with NotebookLM and Canva
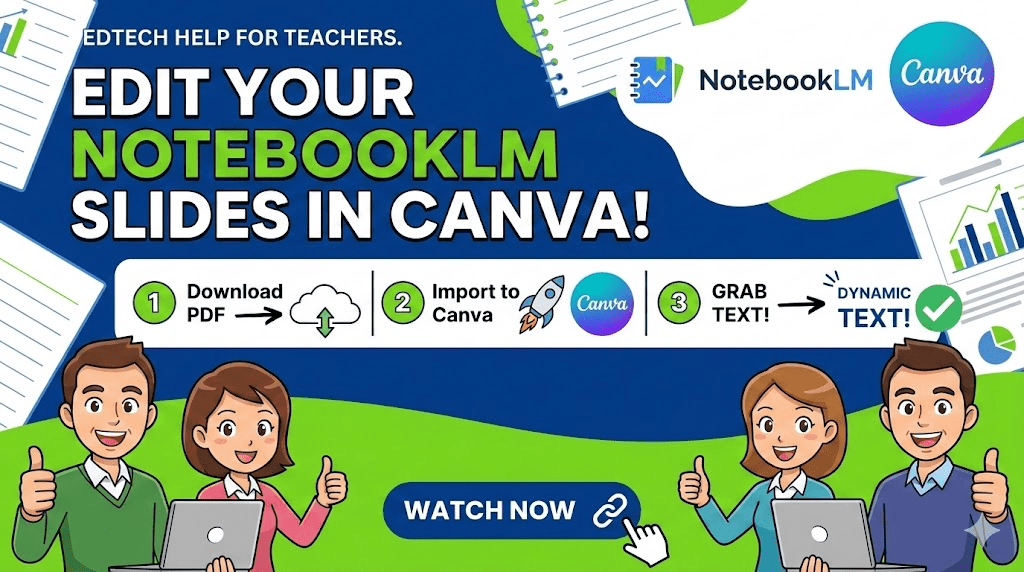
Made with Gemini - The Problem: NotebookLM exports slides as static images, making direct text edits impossible in PowerPoint or PDF.
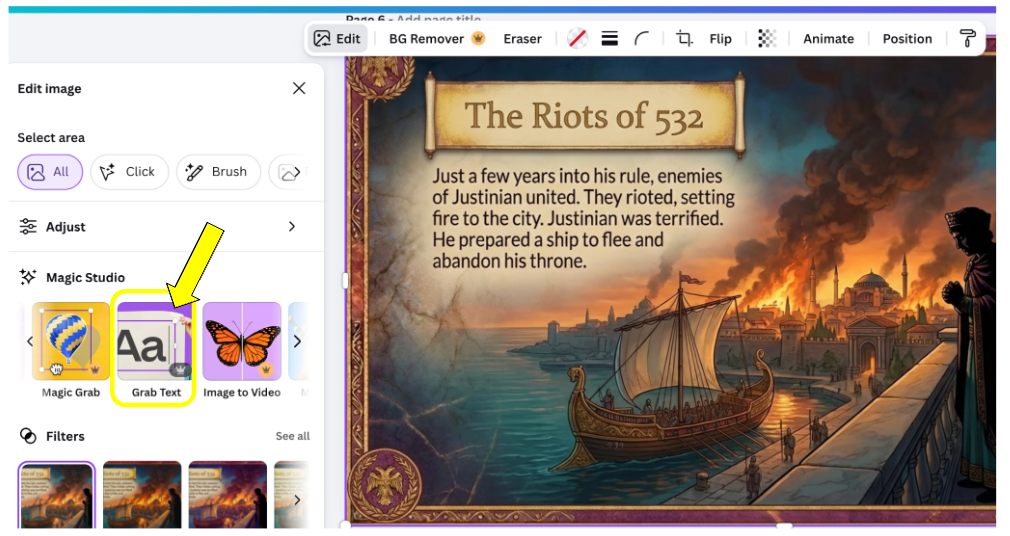
- The Fix: Upload the PDF to Canva and use the Magic Studio “Grab Text” tool to unlock and edit the content.
- The Benefit: Once converted, text stays editable, letting you customize fonts and details for your specific classroom needs.
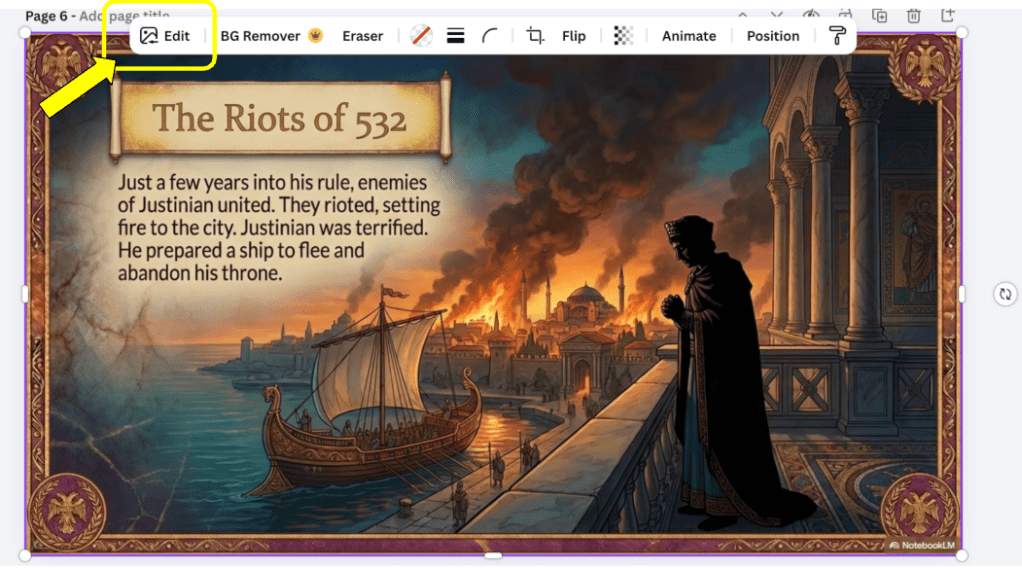
NotebookLM has become an incredibly popular tool for educators looking to quickly synthesize information into visually appealing slide decks. While the platform is excellent for generating content, teachers often find themselves in a difficult position when they need to make specific manual adjustments. When you export your work from NotebookLM as a PowerPoint or a PDF, the resulting file typically treats each slide as a static image. This means you cannot simply click on a text box to fix a typo or add a personalized classroom detail, which can be frustrating when you are trying to tailor a presentation for your students.
Fortunately, there is a simple and effective workaround using Canva that allows you to regain full creative control over your slides. By leveraging Canva’s Magic Studio features, you can transform these static images back into editable text. This process is a game changer for teachers who love the AI-generated layouts of NotebookLM but need the flexibility to tweak the final product before presenting it to a class.
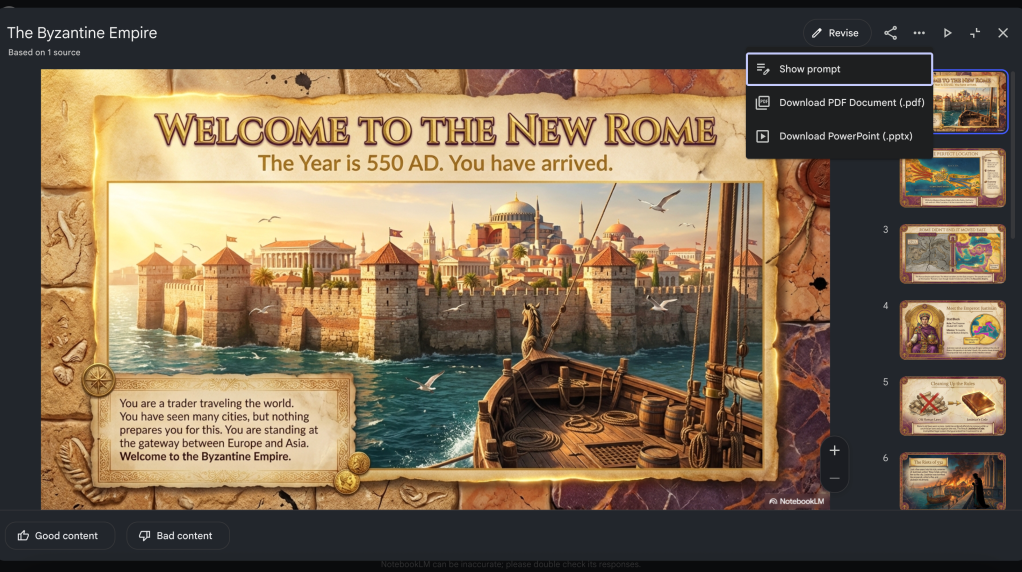
The first step in this process is to head to NotebookLM and locate the slide deck you have created. Instead of worrying about the PowerPoint export, go ahead and download the presentation as a PDF. Once the file is saved to your computer, open Canva and navigate to the create button in the top left corner. Select the option to upload a file and bring your NotebookLM PDF into your Canva account. It may take a moment for the file to process, but once it appears in your uploads, you can open it to begin the editing phase.
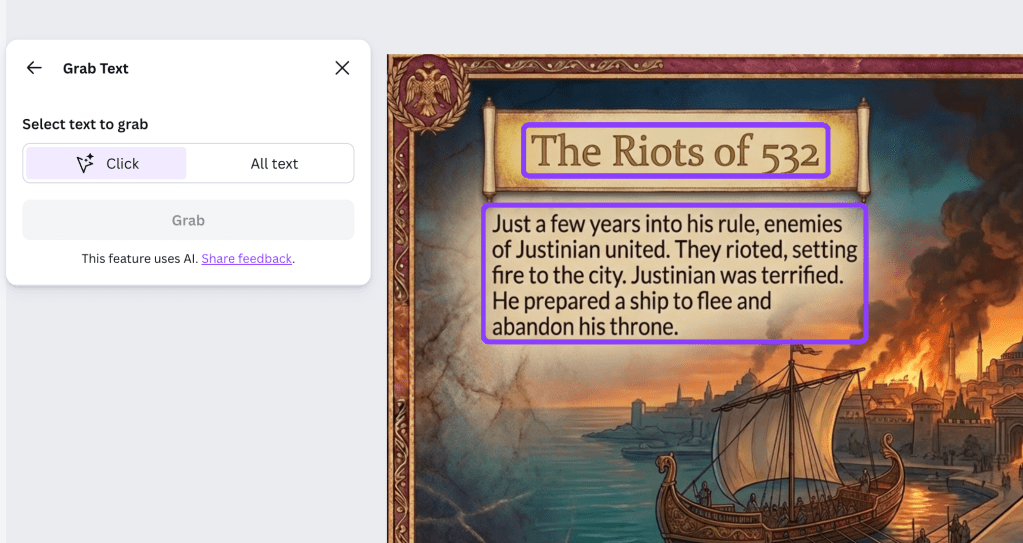
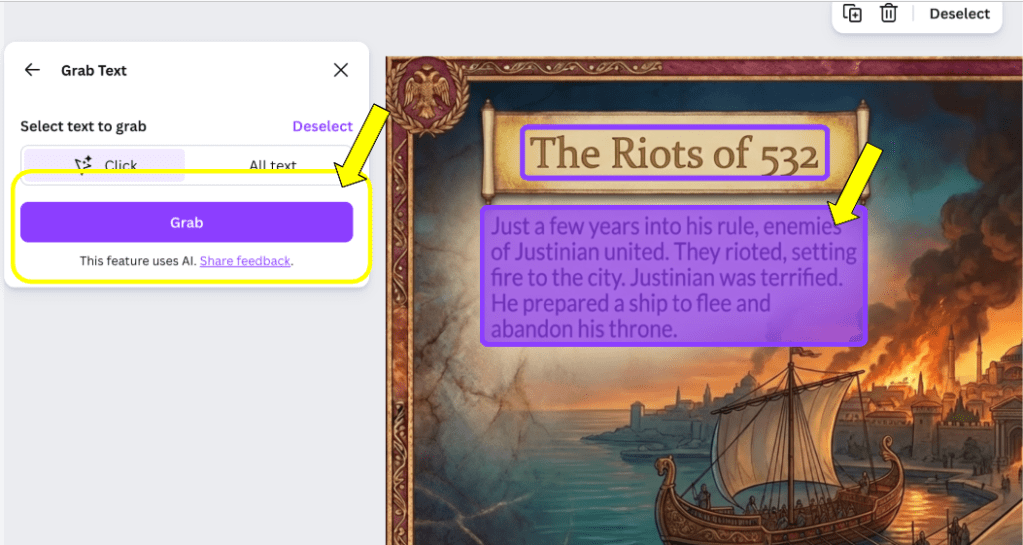
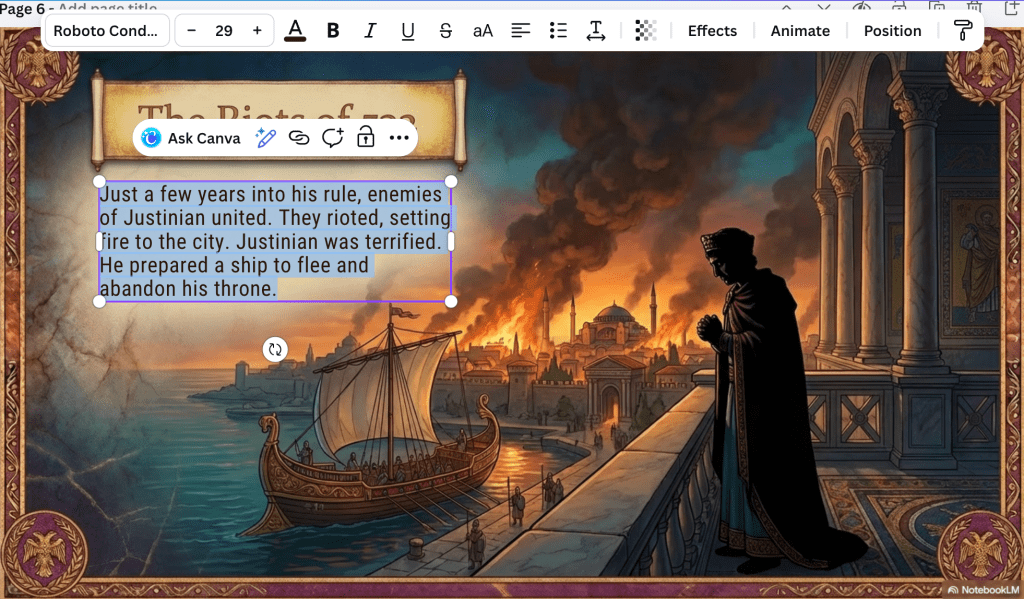
To make the text editable, click on any slide and look for the edit option in the top toolbar. Within the Magic Studio menu, you will find a tool called Grab Text. When you select this, Canva scans the slide to identify characters and words. It will then place a blue box around the text areas it has recognized. You can then click on a specific text box and select the grab function. Within seconds, that static image of words becomes a fully functional text box.
You will need to repeat this grab text process for each individual text box on a slide the first time you work with it. However, the great news is that once you have converted a section to editable text, it stays that way. You can change fonts, adjust colors, remove bolding, or underline key terms to emphasize important concepts for your students. If you return to the slide later, you will find that the text remains ready for any further updates.
This workflow allows you to enjoy the best of both worlds. You get the sophisticated, data-driven content generation from NotebookLM and the unmatched design flexibility of Canva. It is a practical way to ensure your instructional materials are both professional and perfectly suited to your unique teaching style.
This blog post was drafted with the help of Google Gemini to help organize and flesh out my thoughts and ideas regarding how to use Canva to edit slides generated by NotebookLM. I also used NotebookLM to generate a brief audio overview, perfect for those who want to listen and learn on the go.
If you enjoy this blog, you’ll love our new book, History Matters in an AI Era. Available now on Amazon, this book shares practical, research-based strategies for integrating technology into history lessons. You’ll learn how to use technology to increase student engagement and curiosity. Click here to get your copy today.
-
From Whiteboards to Snorkl
A Collaborative Path to Individual Mastery
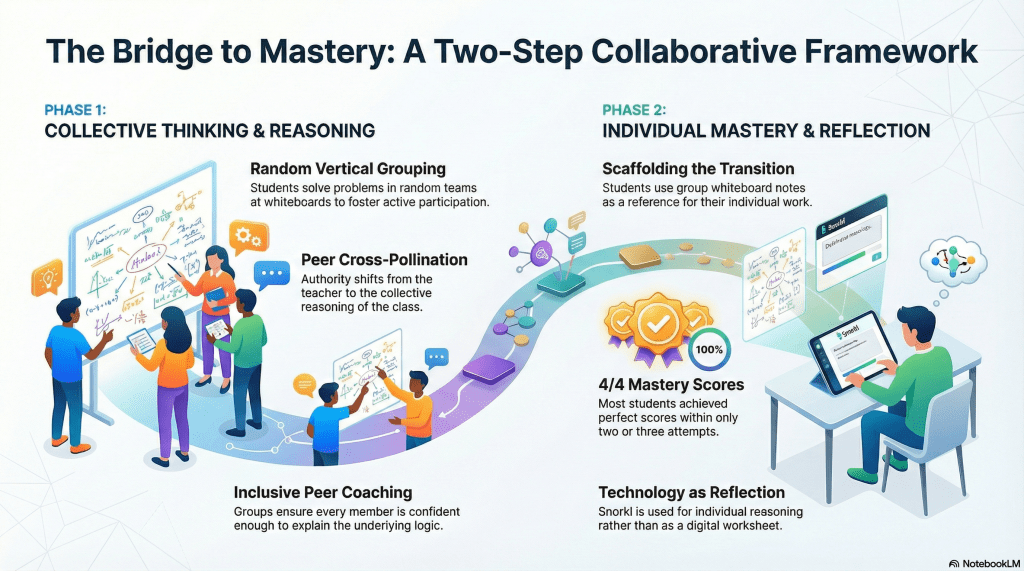
Made with NotebookLM - Collaborative Foundation: Groups used vertical whiteboards and peer-to-peer validation to solve simple interest problems without teacher hints.
- Shared Responsibility: Teams ensured every member could explain the mathematical reasoning, shifting focus from calculation to conceptual understanding.
- Individual Mastery: Students transitioned to Snorkl to independently prove their knowledge, with most achieving a 4/4 mastery score.
Building a classroom environment where students truly own their learning is a goal many of us strive for, yet it can be challenging to balance group collaboration with individual accountability. Recently, a middle school math classroom provided the perfect backdrop for exploring this balance. By combining the collaborative structure of Building Thinking Classrooms with the reflective power of Snorkl, we witnessed students move from initial problem-solving to deep, individual mastery of simple interest concepts.
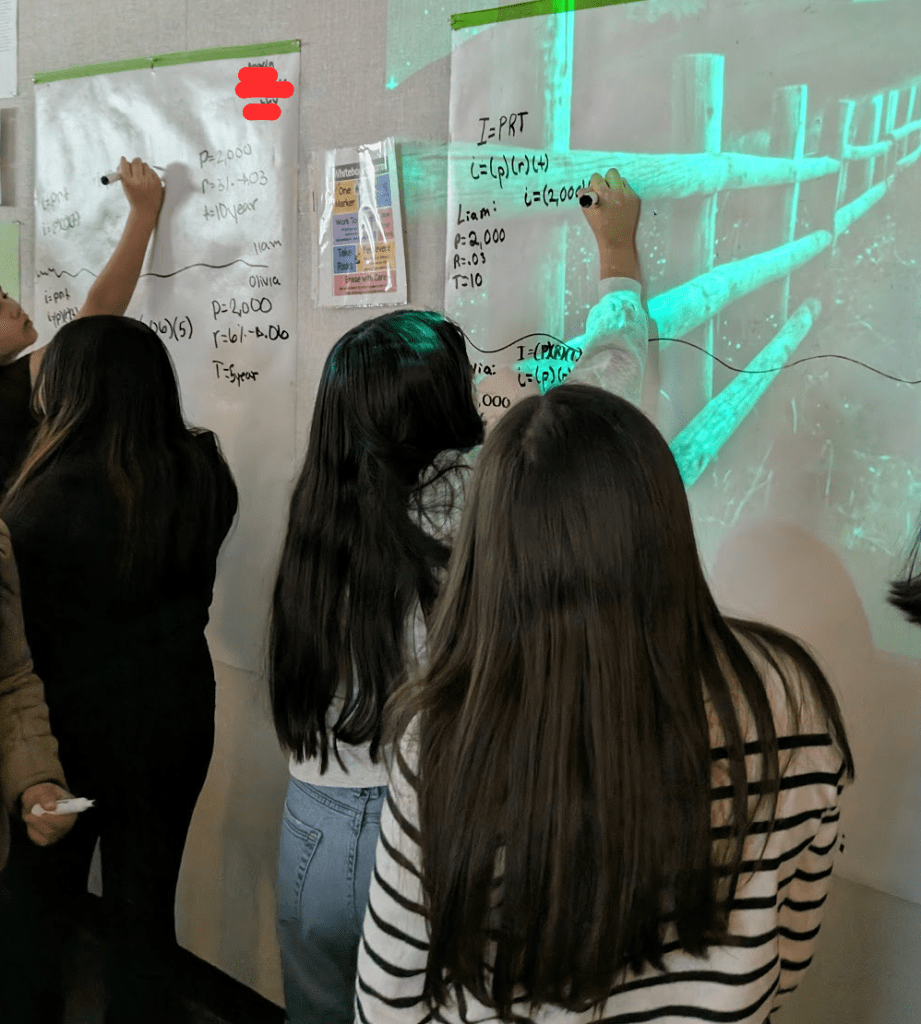
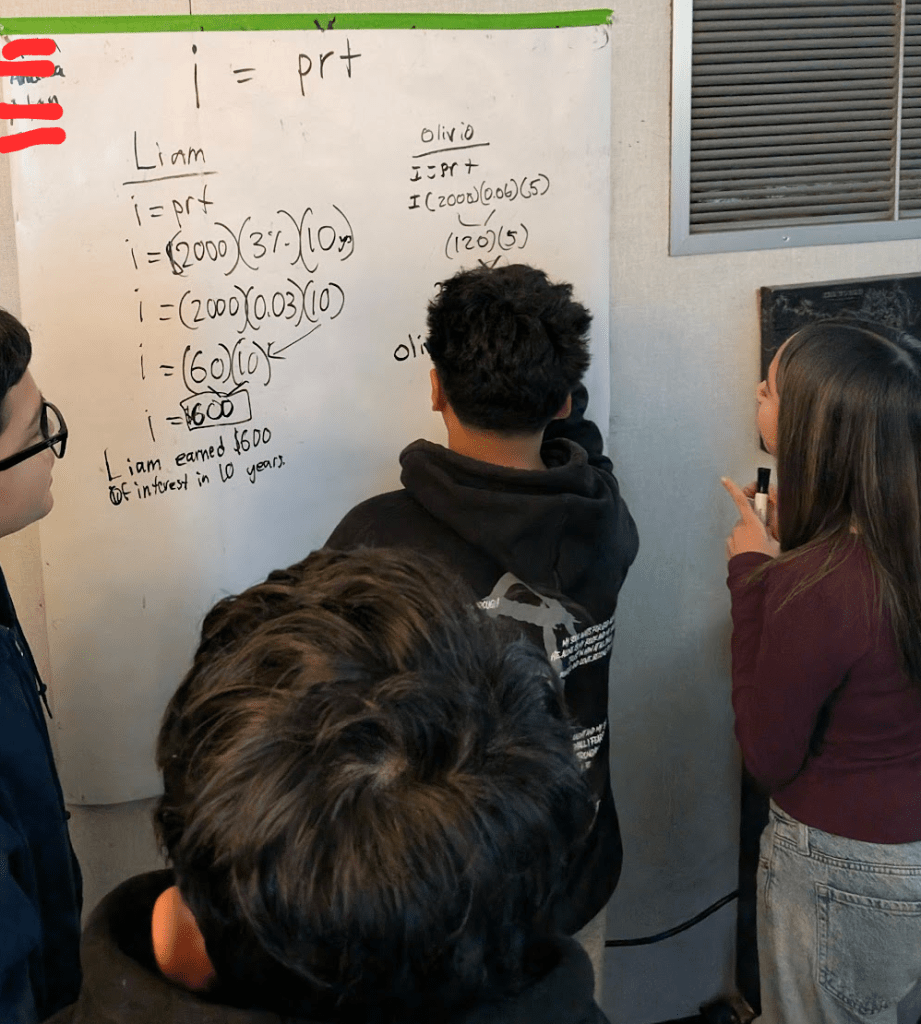
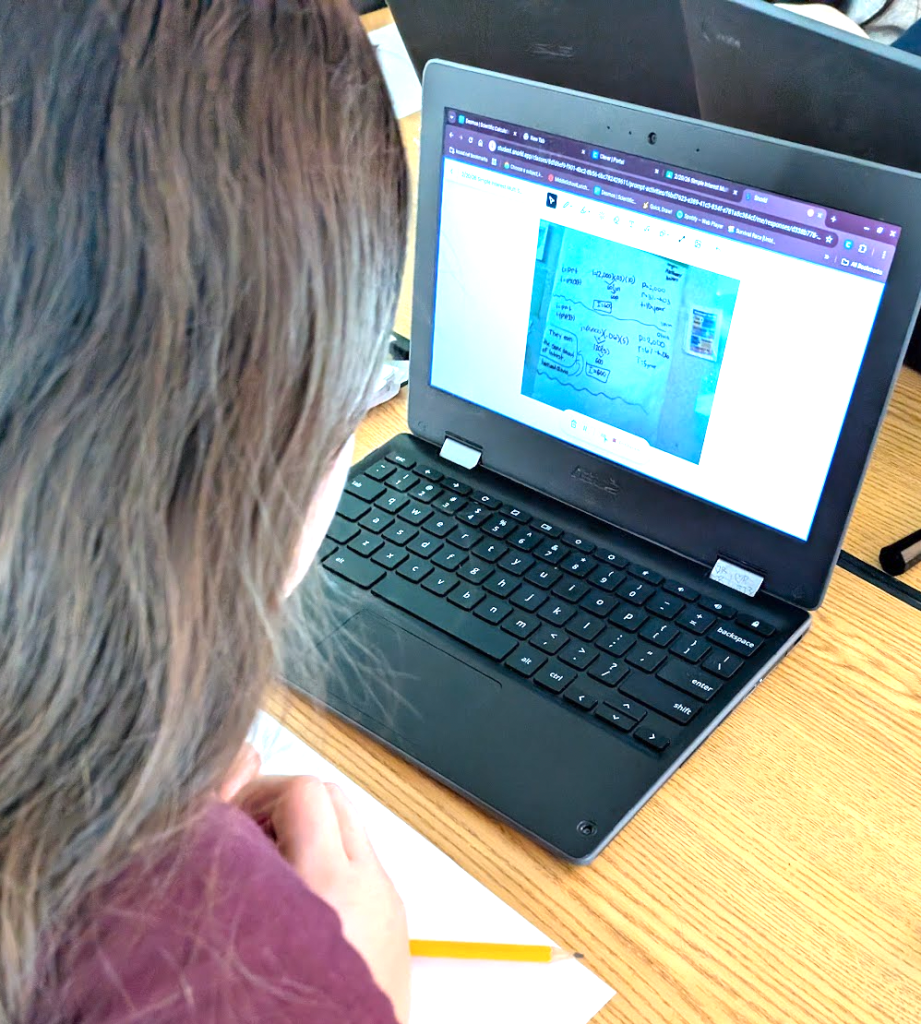
The lesson began with students working in randomly generated groups at vertical whiteboards. The task was a practical application of simple interest: comparing two different scenarios to determine who would pay more interest. However, the goal was not just to find a numerical answer. Students were tasked with explaining the how and why behind their conclusions. This shift in focus transformed the activity from a standard calculation exercise into a deep dive into mathematical reasoning.
One of the most effective parts of this approach was the change in the teacher’s role. We made a conscious decision not to provide hints or answers. When groups hit a wall, we encouraged them to visit other teams to see how their peers were approaching the problem. This cross-pollination of ideas fostered a sense of community and shifted the authority of “the right answer” from the teacher to the collective reasoning of the class.
Within their teams, the students took on the responsibility of ensuring every member understood the logic. It was not enough for one student to solve the problem. The entire group had to be confident that everyone could explain the underlying concepts. This peer-to-peer coaching created a high level of engagement and ensured that the collaborative phase was truly inclusive.
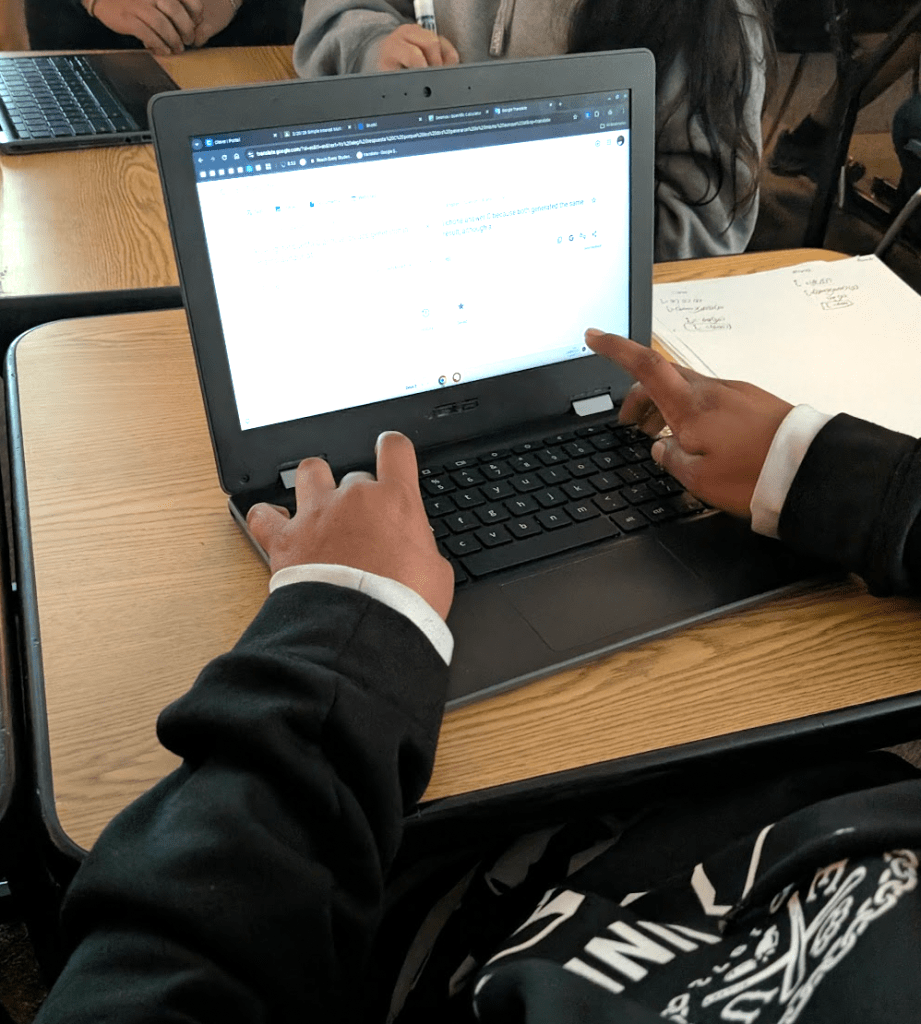
Once a group felt every member was ready, students returned to their individual desks to complete the same problem using Snorkl. This transition was vital. While they were working individually, they were allowed to use their group’s whiteboard notes as a reference. This bridged the gap between the collective brainstorm and the individual demonstration of knowledge.
The results were impressive. Students stayed highly engaged throughout the entire session. By the time they reached the Snorkl phase, they were not just guessing; they were articulating their thoughts based on the solid foundation they built with their peers. Most students achieved a mastery score of 4/4 after only two or three attempts.
This lesson serves as a powerful reminder that when we give students the tools to collaborate and the space to struggle productively, they often exceed our expectations. By using technology like Snorkl as a final stage for individual reflection rather than just a digital worksheet, we can help students prove to themselves that they have truly mastered the material.
This blog post was drafted with the help of Google Gemini to help organize and flesh out my thoughts and ideas regarding this lesson where students engaged in both a Building Thinking Classrooms-style task and Snorkl activity. I also used NotebookLM to generate a brief audio overview, perfect for those who want to listen and learn on the go.
If you enjoy this blog, you’ll love our new book, History Matters in an AI Era. Available now on Amazon, this book shares practical, research-based strategies for integrating technology into history lessons. You’ll learn how to use technology to increase student engagement and curiosity. Click here to get your copy today.
-
A New Way to Connect: The Record Feature in Google Classroom
- Streamlined Access: Built directly into the Stream and Classwork sections, removing the need for external apps or paid subscriptions.
- Versatile Options: Includes audio for verbal messages, video for personal connection, and screen recording for narrated tutorials.
- Enhanced Support: Facilitates multimodal instruction, making it easier to reach English language learners and provide clear, narrated guidance.
Created with NotebookLM For years, educators have looked for the best ways to bridge the gap between digital assignments and personal connection. Many of us have navigated a patchwork of third-party apps and paid subscriptions to record lessons, explain complex topics, or simply send a friendly greeting to our students. These tools have served us well, but they often require extra steps or personal financial investment to unlock the best features.
There is exciting news for those who use Google Classroom as their primary hub. A native Record feature is currently rolling out, allowing you to create audio and video content directly within the platform. This update simplifies the process of creating multi-modal content and keeps everything in one secure location.
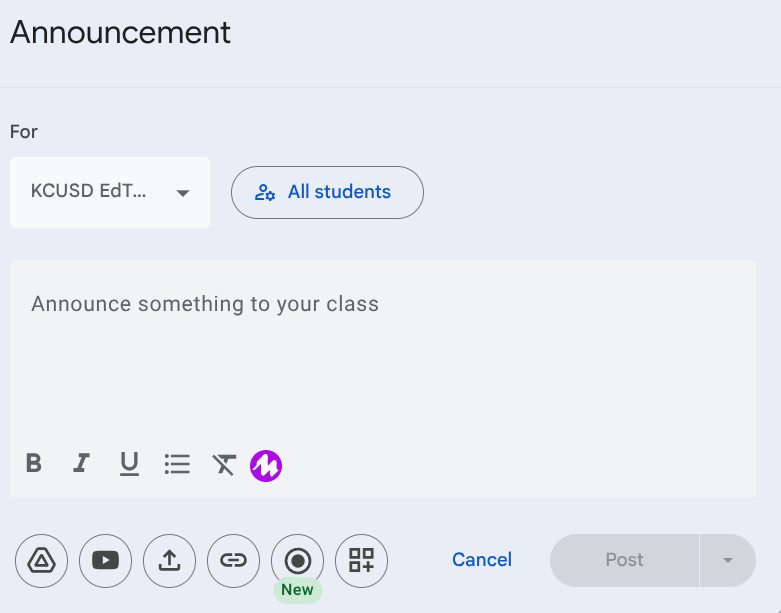
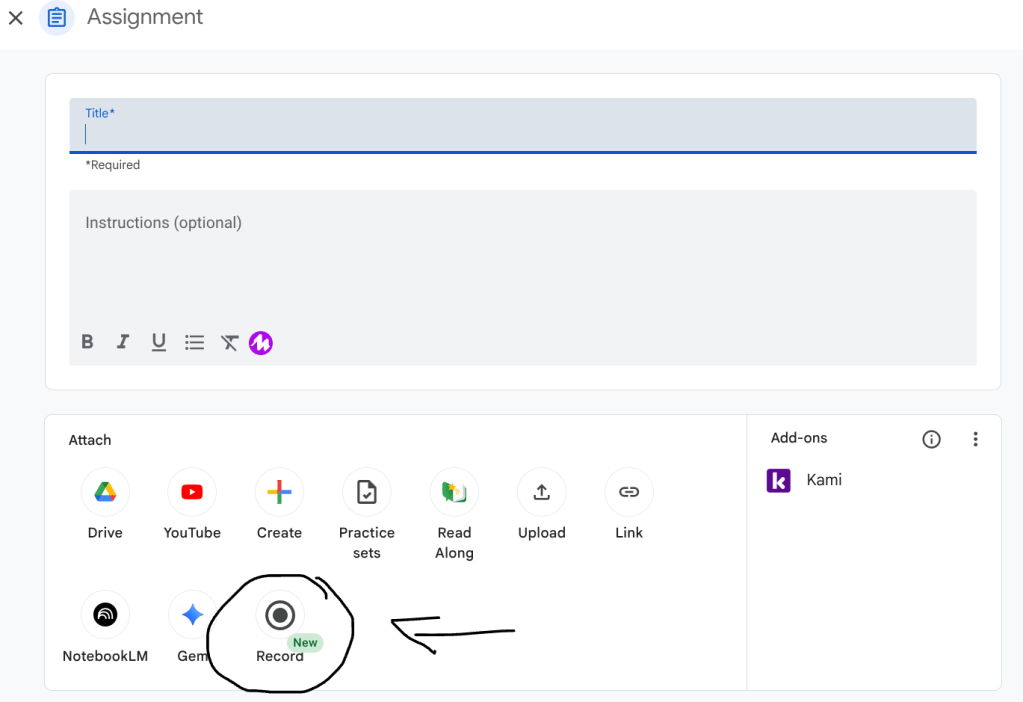
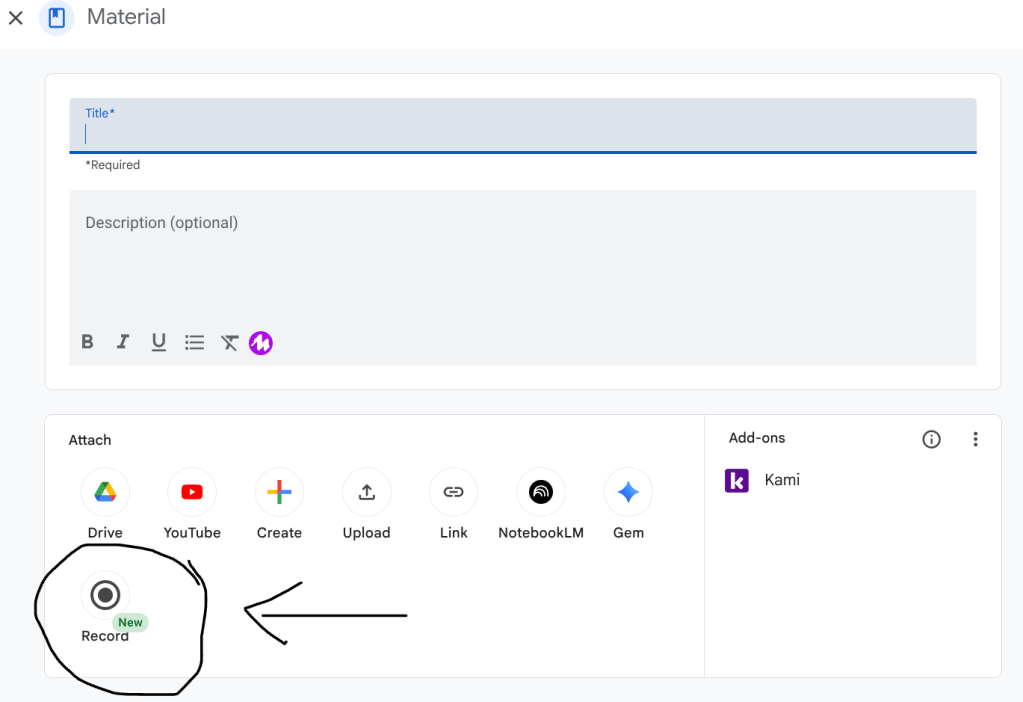
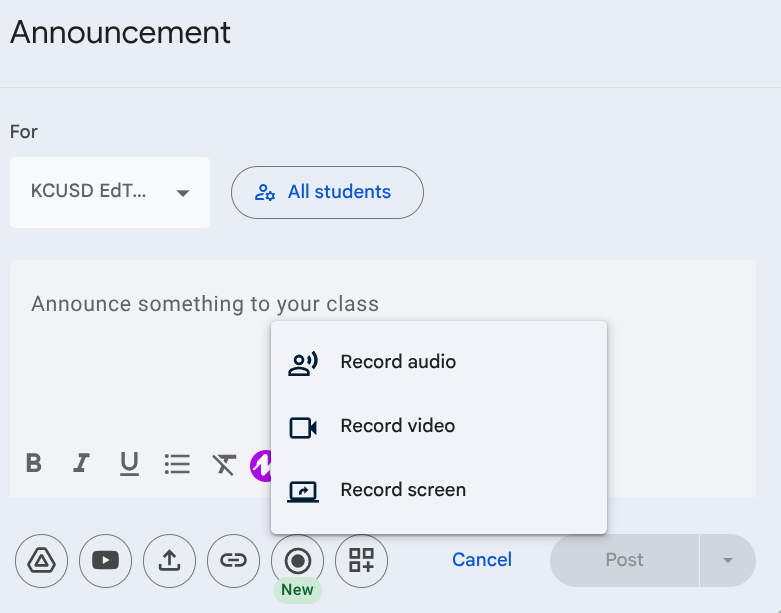
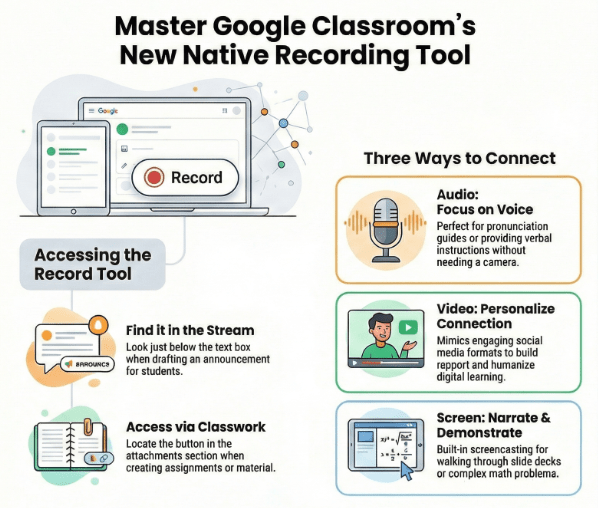
You can find the new Record button in two primary areas. In the Stream, it appears just below the text box when you are drafting an announcement. In the Classwork tab, you will see it located in the attachments section when creating an assignment or posting material. Clicking this button opens a menu with three distinct options: Record Audio, Record Video, and Record Screen.
The Record Audio option is a fantastic way to provide verbal instructions or messages without the need for a camera. This is particularly helpful for teachers who want to share a quick announcement or for any educator looking to provide a quick listening task for English language learners. It allows students to focus entirely on the sound of your voice.
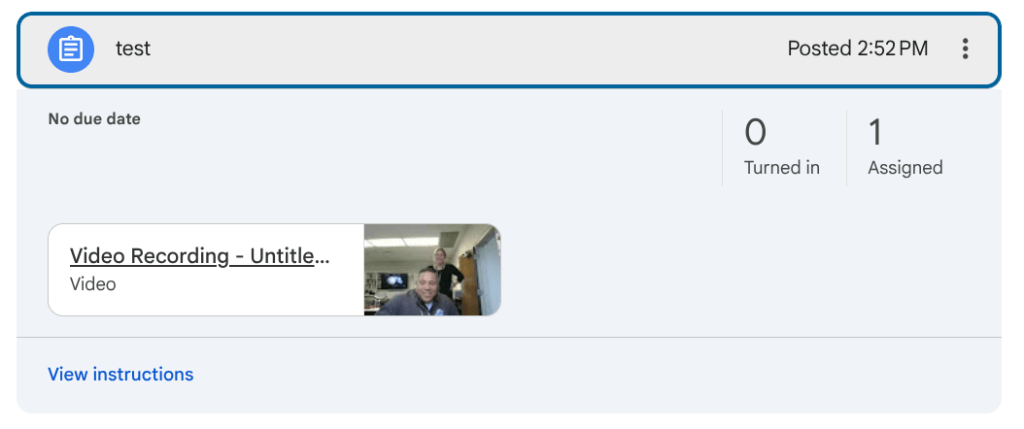
How your video/audio will appear once attached If you want to add a more personal touch, the Record Video option lets you speak directly to your students. Many students are accustomed to following creators on social media, and using video for educational announcements and academic content can mimic that engaging format. It helps build rapport and ensures your students see the person behind the screen.
The Record Screen option functions as a built-in screencasting tool. This is perfect for narrating a slide deck, walking through a complex math problem, or performing a digital read-aloud. Instead of just reading text on a screen, students can follow your cursor and listen to your explanation in real time.
This integration is a significant step toward making digital classrooms feel more interactive and accessible. By using these built-in tools, you can save time and focus more on what matters most: supporting and communicating with your students in the ways they learn best.
This blog post was drafted with the help of Google Gemini to help organize and flesh out my thoughts and ideas regarding how to access and use the new Record function in Google Classroom. I also used NotebookLM to generate a brief audio overview, perfect for those who want to listen and learn on the go.
If you enjoy this blog, you’ll love our new book, History Matters in an AI Era. Available now on Amazon, this book shares practical, research-based strategies for integrating technology into history lessons. You’ll learn how to use technology to increase student engagement and curiosity. Click here to get your copy today.
-
Transforming the Coaching Workflow with NotebookLM
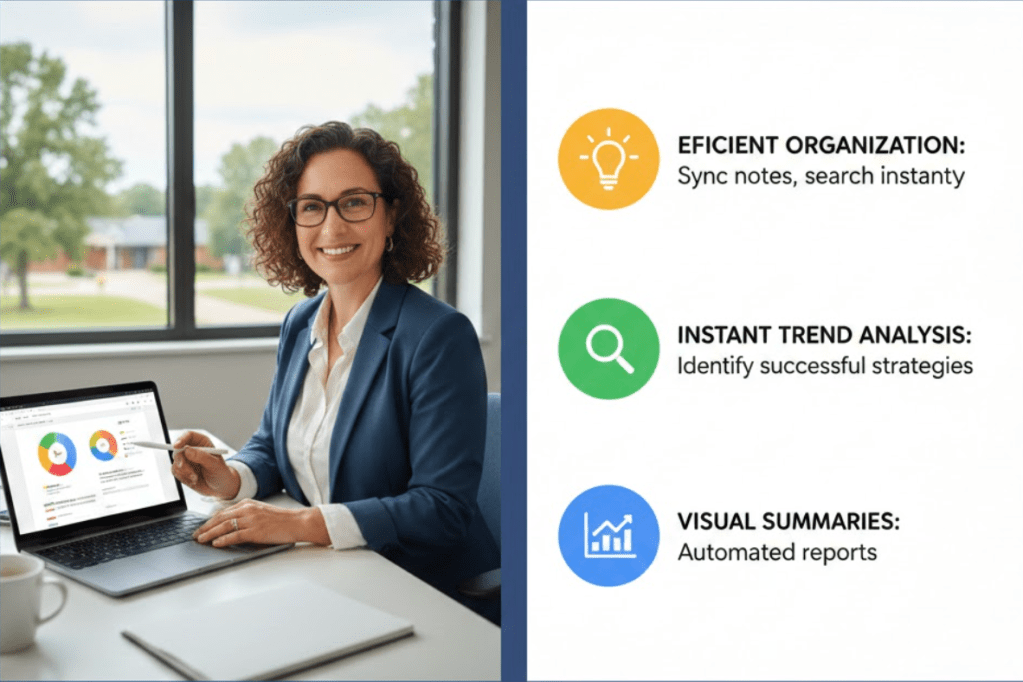
Created with help from Gemini. - Efficient Organization: Transform scattered notes into a searchable database by syncing Google Docs or scans with NotebookLM for instant access to coaching history.
- Instant Trend Analysis: Use the chat feature to quickly identify successful strategies and tech trends across different classrooms and school sites.
- Automated Visual Summaries: Create custom infographics and slide decks through the Studio to provide administrators with professional, real-time snapshots of progress.
As an instructional coach, my days are spent moving between dozens of schools and supporting hundreds of teachers. The sheer volume of information can be overwhelming. To provide the best support, I take detailed notes on every coaching interaction. These notes are essential for guiding next steps when I return to a site and for tracking which strategies are effectively working across different locations. This allows me to share successful tools, ideas, and strategies with other educators who might benefit from them.
Whether you are an instructional coach, an administrator, a counselor, or an RSP teacher, managing notes and tracking trends is a universal challenge. Since I began using NotebookLM as a database for my coaching logs, this workflow has become significantly more efficient.
Organizing Your Digital Workspace
The foundation of a good tracking system is organization. For my workflow, each school site has its own dedicated Google Doc. Within that document, I use tabs for each department and individual teacher. Every time I meet with a teacher or a department, I record the date and type my notes directly into the document. These entries might cover coaching sessions, demo lessons, or professional development workshops.
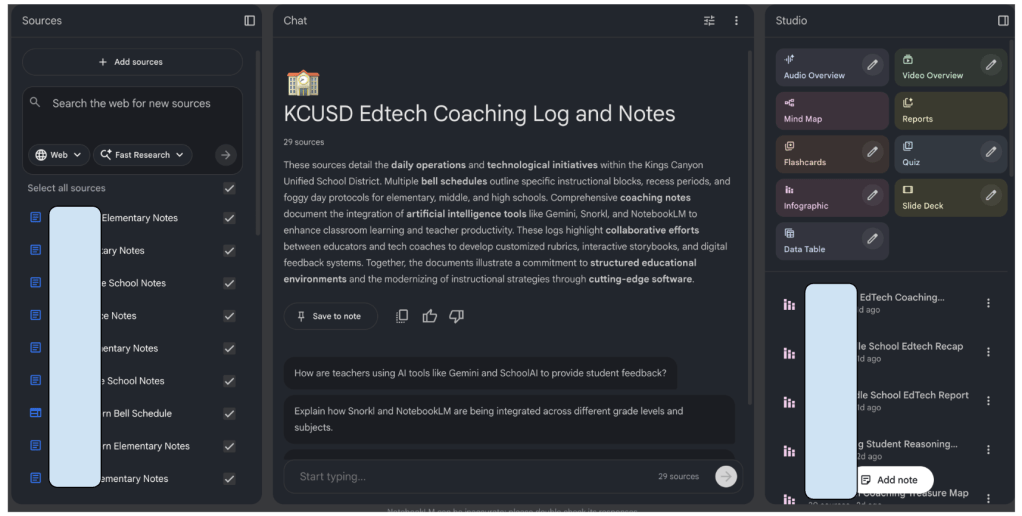
School names have been blocked for privacy. Because our Google Workspace subscription guarantees data privacy, I can include specific names and details without needing to redact information. This ensures the records remain accurate and useful for long-term planning. Each of these school-specific documents is then entered as a source into NotebookLM.
Keeping Data Current and Accessible
The true power of this system lies in how easily the data stays updated. When I add new notes to a Google Doc after a day of coaching, I simply open NotebookLM and sync the source. This ensures that the AI assistant is always working with the most recent information.
With this database in place, I can ask specific questions about my notes rather than scrolling through pages of text. For instance, when meeting with administrators to discuss which tools and strategies have been trending at a specific grade level over the year, I use the chat feature. It can quickly identify patterns and pull out data that could otherwise take hours to compile manually.
Visualizing Progress with the Studio
Beyond just answering questions, the Studio tools within NotebookLM allow for the creation of helpful visualizations. There are four specific tools that have become essential for my role: the Infographic creator, the Slides creator, and the audio and video overviews.
The Infographic tool is perfect for creating a “one-pager” that summarizes key points. If I need more detailed data visualizations, the Slides creator helps build a presentation-ready format. The audio and video overviews provide media versions of the data, which can offer a different perspective on the trends occurring across school sites.
Practical Application: The Two-Day Recap
My schedule typically involves supporting a school for two consecutive days before moving to the next site. At the end of those two days, I sync my updated notes and ask the Infographic tool to create a recap of the support provided during that window.
To make the information more engaging and personal to the community, I prompt the tool to create the recap using the style and color scheme of the school mascot. Before I even leave the building, I send this infographic to the administration and staff. It provides them with an immediate snapshot of the work we accomplished and a clear view of our next steps.
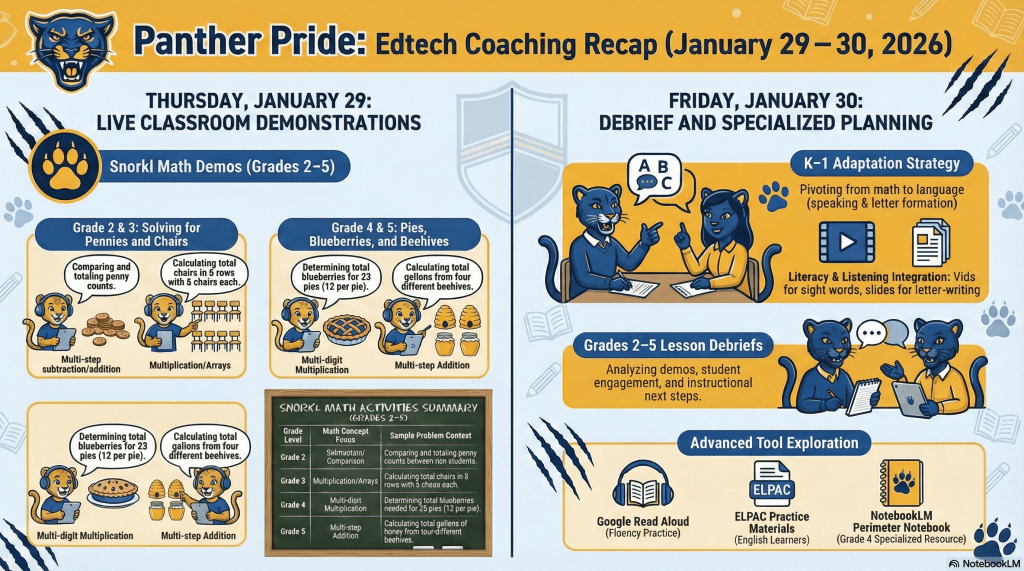
Sample infographic recapping two days of edtech coaching. Getting Started with Your Own Database
If you are interested in trying this workflow, the first step is to upload your preferred method of note-taking to NotebookLM. While I prefer Google Docs, the platform is flexible. If you take handwritten notes, you can upload scans or images of those pages and the system will still be able to process the information.
Once your notes and other relevant resources are added, start using the chat feature to extract insights. Experiment with the Studio tools to see which visualizations best serve your specific needs. It is important to remember that you should only upload documents you own or those that are open-source and public. Avoid uploading copyrighted materials.
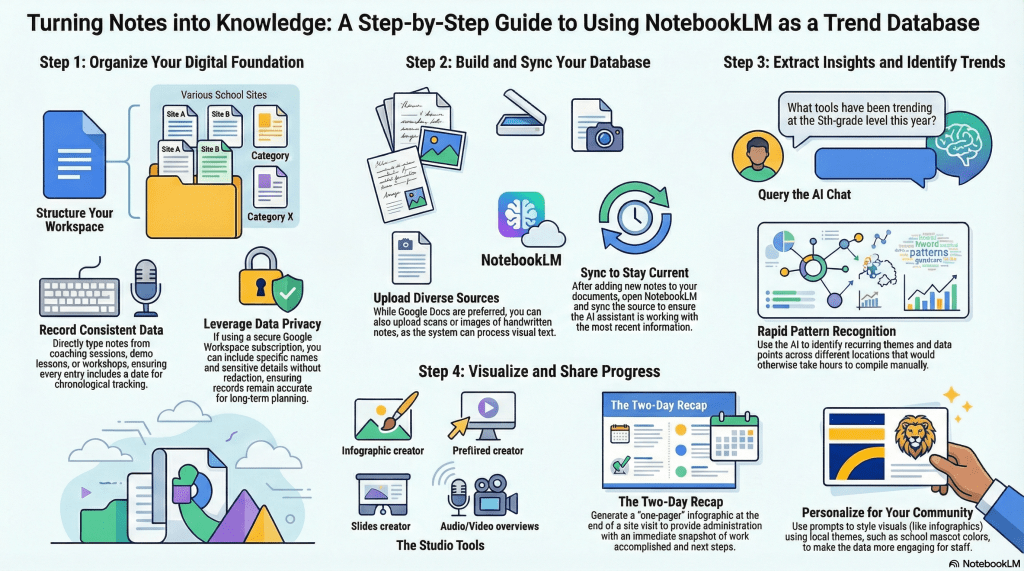
Created with help from NotebookLM. By turning your daily notes into a searchable, visual database, you can spend less time searching for information and more time providing meaningful support to your colleagues and students.
This blog post was drafted with the help of Google Gemini to help organize and flesh out my thoughts and ideas regarding how I use NotebookLM to organize and streamline my instructional coaching workflow. I also used NotebookLM to generate a brief audio overview, perfect for those who want to listen and learn on the go.
If you enjoy this blog, you’ll love our new book, History Matters in an AI Era. Available now on Amazon, this book shares practical, research-based strategies for integrating technology into history lessons. You’ll learn how to use technology to increase student engagement and curiosity. Click here to get your copy today.
Tech Coach Juarez
You cannot spell teach without tech.