

- Inclusive Learning: Captions visually reinforce spoken instruction, aiding diverse learners and improving focus.
- Instant Setup: Enable them in presentation mode via the three-dot menu or the
Ctrl/Cmd + Shift + Cshortcut. - Customizable: Easily adjust the text size and position (top or bottom) for optimal readability.
In any classroom, keeping every student engaged is a constant challenge. Traditional lectures place a heavy cognitive load on auditory processing, creating invisible barriers for diverse learners. Fortunately, a simple, built-in tool in Google Slides can immediately transform how your students consume information: live captioning.
Enabling captions can be a great tool for supporting learners as you implement universal design (UDL) principles. For English language learners, seeing spoken words in real time bridges the gap between pronunciation and vocabulary comprehension. For neurodiverse students—such as those with ADHD or auditory processing disorders—captions serve as a vital visual anchor that keeps their attention focused when auditory distractions creep in. Even in a noisy room with poor acoustics, captions ensure no student misses a crucial instruction or concept.
Bringing this assistive technology into your classroom takes only a few seconds.
How to Enable Captions in Google Slides
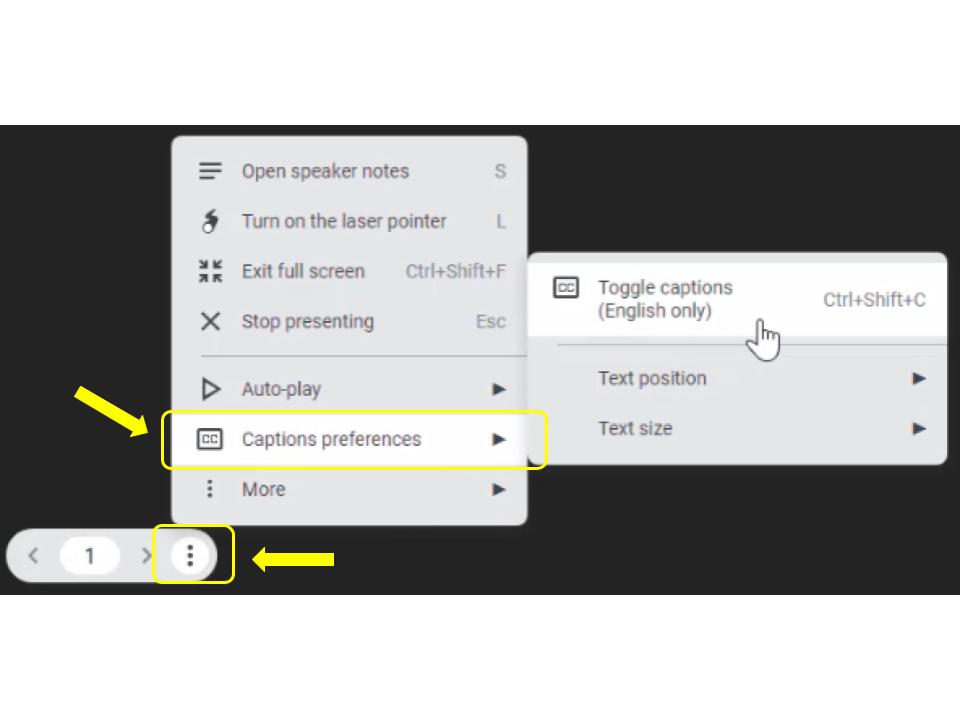

- Start Presenting: Open your Google Slides deck and enter presentation mode.
- Locate the Menu: Move your cursor to reveal the presenter toolbar on the screen and click the three vertical dots (More options).
- Select Preferences: Hover over “Captions preferences” in the menu.
- Toggle Captions: Click “Toggle captions”. (You can also use the handy keyboard shortcut Ctrl + Shift + C on Windows/ChromeOS or Cmd + Shift + C on Mac to turn them on instantly!).
Customization Options
To make captions as readable as possible, Google Slides lets you customize the layout to fit your classroom setup:
- Text Position: Under “Captions preferences,” select “Text position” to choose whether your captions appear at the top or bottom of your slides.
- Text Size: Select “Text size” to change the font size on screen. You can adjust the text scale to extra small, small, medium, large, or extra large to ensure even the students in the very back row can read along clearly.
By making live captioning a standard, default part of your daily presentations, you can create a more equitable, inclusive, and highly focused learning environment for every single student in the room.
This blog post was drafted with the help of Google Gemini to help organize and flesh out my thoughts and ideas regarding why and how to enable captions in Google Slides. I also used NotebookLM to generate a brief audio overview, perfect for those who want to listen and learn on the go.
If you enjoy this blog, you’ll love our new book, History Matters in an AI Era. Available now on Amazon, this book shares practical, research-based strategies for integrating technology into history lessons. You’ll learn how to use technology to increase student engagement and curiosity. Click here to get your copy today.

Leave a comment